
Overview
A File Asset stores a file in the project so it can be reused across API steps and test runs. File Assets are useful when an API expects a file upload, such as:
-
Images
-
PDFs
-
CSV or Excel files
-
XML or JSON documents
-
ZIP files
-
Any other binary file
The file is stored once and referenced by the step during execution. It does not need to be uploaded manually for every test run.
Prerequisites
Before starting, make sure that:
-
You have access to the required project.
-
You have permission to create or modify Data Item assets.
-
You know the API's expected form field name.
-
You know the required file name and content type, if applicable.
Upload a File Asset from the File Assets Section
-
Open the required project.
-
In the asset explorer, open File Assets.
-
Click + Upload File.
-
Select the file from your computer.
-
Confirm the upload.
The uploaded file appears in the project's File Assets list. The list displays the following columns:
|
Column |
Description |
|---|---|
|
File Name |
The original name of the uploaded file |
|
Content Type |
The MIME type detected for the file |
|
Size |
The file size |
|
Updated |
The date and time the file was last updated |
Each file has download and delete actions available.
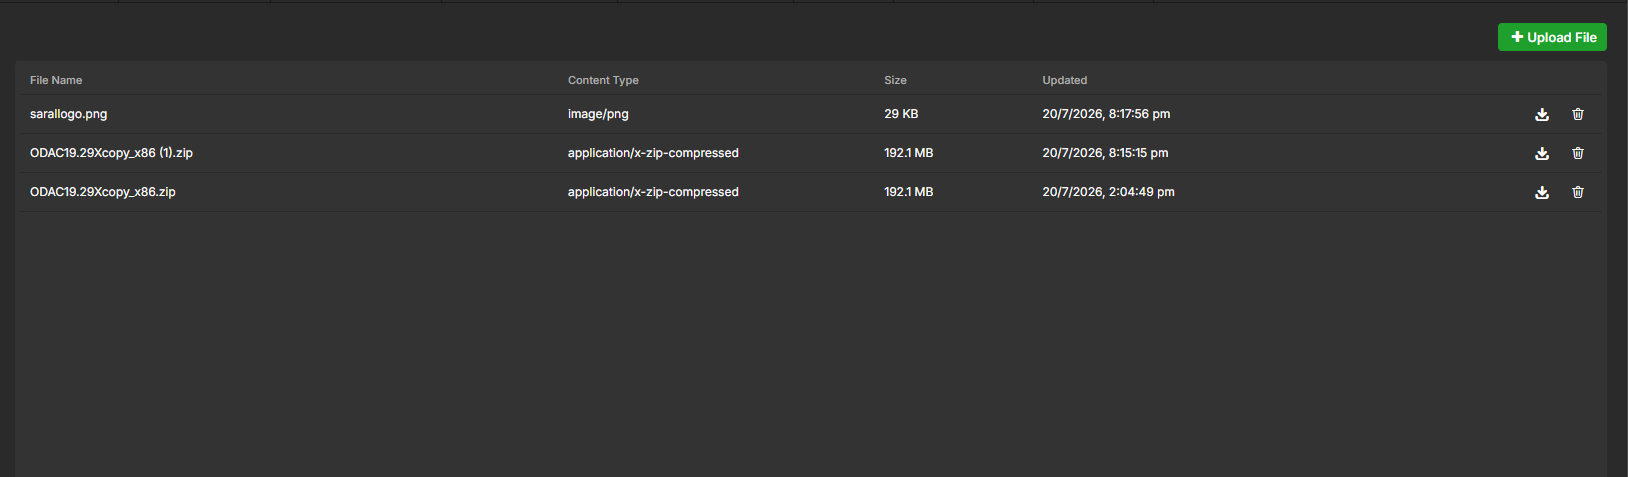
The file asset has its own title and can be reused by multiple sequence steps.
Upload a File Asset While Configuring the Step
You can also upload a new File Asset directly while configuring a multipart request.
-
Open the required Sequence.
-
Add a new API step or open an existing API step.
-
Select the request body type Multipart Form Data.
-
Click + Add part.
-
In the Edit Multipart dialog, enter the API form field name in Name.
-
Set Type to File.
-
Under Set as default for, select New.
-
In the Upload new file section, click Upload file and choose the file from your computer.
-
Optionally, enter a different name in the File name field.
-
Click Save.
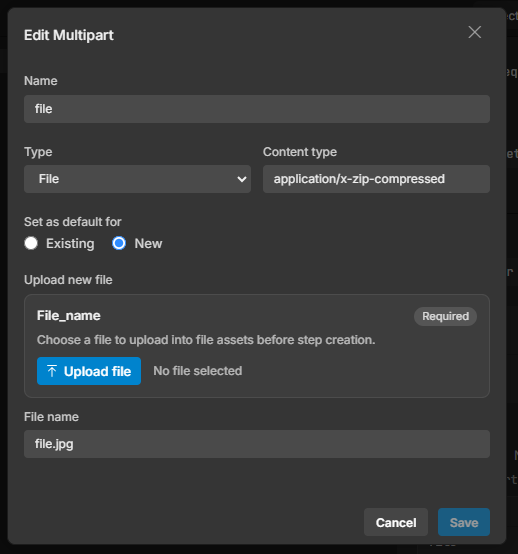
The selected file is uploaded as a File Asset and automatically linked to the step.
Note: The helper text in the upload section reads: "Choose a file to upload into file assets before step creation."
Important: The File name field sets the name sent to the API during the request. It does not override the file name in blob storage. The original file name is preserved in File Assets.
Configure an Existing File Asset in the Step
To use a File Asset that has already been uploaded:
-
Open the API step.
-
Set the request body type to Multipart Form Data.
-
Click + Add part, or edit an existing multipart part.
-
In the Edit Multipart dialog, enter the form field name expected by the API in Name.
-
Set Type to File.
-
Under Set as default for, select Existing.
-
Select the required File Asset from the File asset dropdown.
-
Optionally specify:
-
File name — the name sent to the API.
-
Content type — for example,
application/pdforimage/png.
-
-
Click Save.
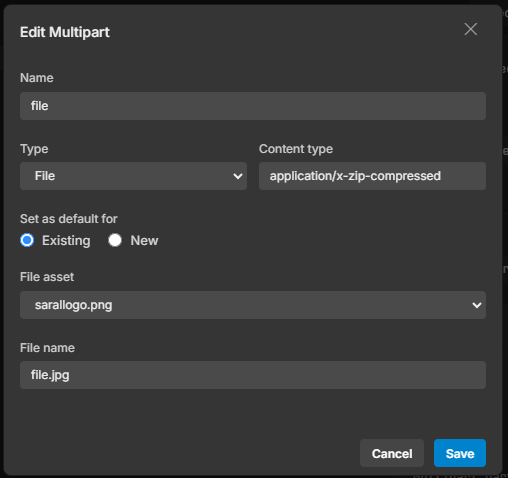
Multipart Form Data Editor
When the body type is set to Multipart Form Data, the step displays a multipart-specific editor instead of the raw body editor. A hint text appears below the body type radio buttons:
Multipart parts are configured here. The main body stays empty in this mode.
The multipart table displays the following columns:
|
Column |
Description |
|---|---|
|
Name |
The form field name |
|
Type |
The part type (File or Text) |
|
Source |
The source file asset name |
|
Override |
The overridden file name and content type, if set |
|
Actions |
Edit and Delete buttons |
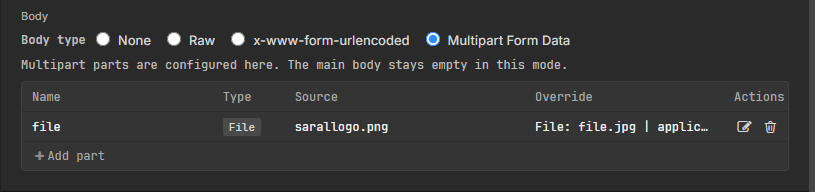
The + Add part button is always available in editable mode, even when no parts exist. In read-only views, the Actions column and + Add part button are hidden.
Add Text Fields Alongside the File
If the API requires additional form fields:
-
Click + Add part.
-
Set Type to Text.
-
Enter the field name and value.
-
Click Save.
-
Repeat for each required field.
Example configuration:
|
Name |
Type |
Value |
|---|---|---|
|
|
File |
|
|
|
Text |
|
|
|
Text |
|
Example: Uploading a PDF
Assume the API expects a PDF in a multipart field named document.
Configure the step as follows:
|
Setting |
Value |
|---|---|
|
Body type |
Multipart Form Data |
|
Name |
|
|
Type |
File |
|
File asset |
|
|
File name |
|
|
Content type |
|
The resulting request is equivalent to:
POST /api/documents
Content-Type: multipart/form-data
with a file part similar to:
document = invoice.pdf
Content-Type: application/pdf
Content Type Guidance
The Content type field is optional for many requests. When the API validates the MIME type, provide the correct value.
Common content types:
|
Content Type |
Use Case |
|---|---|
|
|
PDF documents |
|
|
PNG images |
|
|
JPEG images |
|
|
CSV files |
|
|
JSON documents |
|
|
ZIP archives |
|
|
ZIP archives (alternate) |
|
|
Generic binary files |
If no content type is specified, the uploaded file's detected content type may be used.
Note: Some file types (such as .har and .bin) may display as application/octet-stream when their specific MIME type is not recognized by the system.
File Asset Reuse
The same File Asset can be referenced by multiple steps and sequences. This is useful for:
-
Reusing standard test documents
-
Running the same test with a consistent payload
-
Avoiding repeated uploads
-
Maintaining test files centrally at project level
Warning: Changing or deleting a File Asset may affect steps that reference it. Confirm its usage before making changes.
File Asset Caching During Test Execution
File Assets are cached when they are first required by a running step during timeline runs.
How caching works
During execution:
-
The runner reads the File Asset from project storage.
-
The file is staged in the runner's temporary disk-backed cache.
-
The request uses the cached file stream as the multipart file body.
-
Subsequent requests that use the same unchanged File Asset reuse the cached copy.
This reduces repeated reads from project storage and improves performance when the same file is used by multiple virtual users, steps, or iterations.
Cache identity
The cache is identified using the File Asset's storage key, last-updated timestamp, and file size. If the File Asset is modified, the cache identity changes and the updated file is staged automatically.
Cache behavior
-
The cache is disk-backed rather than fully memory-backed to avoid large in-memory allocations.
-
The cache is bounded so total cached file size does not grow without limit.
-
When the cache limit is reached, older entries are evicted to make room for newer ones.
-
Multiple virtual users may request the same file at the same time; the cache avoids duplicate downloads.
-
The cache supports cancellation safely and prevents cached files from being deleted while still in use.
Important considerations
-
Caching is handled automatically; users do not need to enable or configure it.
-
The cache is local to the runner or agent executing the test.
-
Different runners or geographic agents may each create their own local cached copy.
-
The cache uses temporary storage and does not replace the original File Asset.
-
Large files may require sufficient temporary disk space on the runner or agent.
-
Deleting or updating a File Asset can affect steps that reference it.
Switching Between Body Types
The API step editor supports the following body types:
-
None
-
Raw
-
x-www-form-urlencoded
-
Multipart Form Data
When switching between body types:
-
Switching to x-www-form-urlencoded creates an editable blank parameter row.
-
Switching from x-www-form-urlencoded to Raw initializes the body as
{}. -
Switching to None clears the body and removes the
Content-Type. -
Switching to Multipart Form Data initializes multipart metadata and keeps the main raw body empty.
-
When the
Content-Typeheader is changed, the correct Body Type is selected automatically. -
If
Content-Typeis missing, Body Type defaults to None.
Note: A warning popup is displayed when switching Body Types if the current body contains unsaved content.
Troubleshooting
The file is not available in the File Asset list
Confirm that:
-
The file upload completed successfully.
-
You are working in the correct project.
-
You have permission to view the File Asset.
-
The asset has not been deleted.
-
Duplicate file uploads are prevented; if a file with the same name already exists, a validation message is displayed.
The API rejects the request
Check the following:
-
The multipart field name exactly matches the API specification.
-
The request body type is Multipart Form Data.
-
The part type is File, not Text.
-
The correct File Asset is selected.
-
The file name and content type are correct.
-
Any required text fields have also been added.
The API expects a raw binary request body
Some APIs expect the entire request body to be raw binary, for example with:
Content-Type: application/octet-stream
This is different from a multipart/form-data upload. Confirm the API contract before configuring the step. If the endpoint does not accept multipart form data, contact the platform administrator to confirm whether raw binary File Asset request bodies are supported.
Troubleshooting caching issues
If a request fails while preparing the file upload:
-
Confirm that the File Asset still exists.
-
Confirm that the runner or agent has access to project storage.
-
Check that sufficient temporary disk space is available.
-
Verify that the File Asset was not updated or deleted during the test run.
-
Retry the step after confirming the asset is available and valid.