The Find image block searches for a specific image on the whole screen or within a defined area. It is often used to validate that a system under test is in the correct visual state before deciding whether a case should pass or fail.
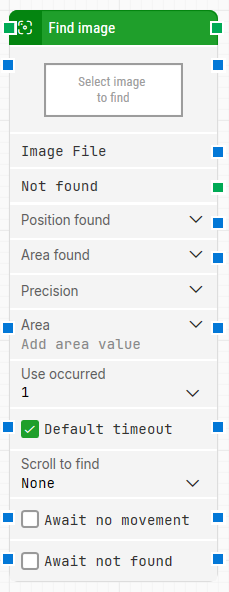
Fully expanded, the Find image block shows the following properties:
Note: The screenshot on this page uses the Elegance Design, introduced in 2025.3. If you are using an earlier version, your layout may look different.
Quick-start
Drag Find image onto the canvas.
Capture the reference image in Image File (Select image to find), connect the block in the flow, and optionally adjust Area, Precision, and timeout or wait settings.
Run the flow when it’s ready and use Not found or the position/area outputs to control the next steps.
Building block parameters
Parameters
Block header: Shows the current name of the Find image block. You can rename it by double-clicking the header and typing a new title. The green input connector triggers the search when the flow reaches this step, and the green output connector triggers when the image has been found. If Use occurrence is set to All, the main output triggers once per occurrence.
Image File: Holds the image to search for.
Click the capture area (Select image to find) or right-click and choose Capture new image to define the reference image.
You can also use an Image Collection (multiple variations of the same UI element) and edit it by right-clicking the field.
Right-click and select Clear image to remove the selection.
When the block runs and the image is found, the interaction point defined on the image (red cross-hairs) is used as the reference position.
Not found: Green output connector that triggers if the image is not located before the timeout expires. This is typically used to branch the flow or explicitly fail the case.
Position found: The screen coordinates where the image was found, as X and Y values. The top-left corner of the screen is position 0, 0. This position represents the interaction point on the image, not the upper-leftmost pixel.
Area found: The screen area where the image was found, as X, Y, Width, and Height coordinates, starting from the upper-leftmost pixel. The origin 0, 0 is the top-left corner of the screen.
Precision: Adjusts how strictly the image recognition algorithm matches the reference image.
In most cases, Pixel perfect is recommended as it only matches identical images.
In scenarios with small background changes or rendering differences (for example, text overlaying an image in different browsers), lowering the precision can make the search more tolerant.
Area: Defines a specific area of the screen to search within, using X, Y, Width, and Height. If no area is set, the entire screen is searched. You can enter values manually, or right-click and select Capture area to define it visually. The expanded view lets you work with position and size properties separately.
Use occurrence: Determines which occurrence of the image to use when more than one match is found.
Set a specific index (for example, 1 for the first match).
Choose All to iterate through every occurrence. When All is selected, the main output triggers once per match and the Current index and Completed properties become relevant.
Current index: The index of the image currently being processed when Use occurrence is set to All. For example, if three occurrences are found, this property will contain 1, then 2, and finally 3` across the iterations.
Completed: Green output connector that triggers when all occurrences have been processed while Use occurrence is set to All.
Default timeout: Controls how the timeout is determined:
When the checkbox is not selected, the block uses the explicit Timeout value, which defaults to 10 seconds unless changed.
When the checkbox is selected, the block uses the Default timeout defined in the flow settings.
Timeout (sec): Sets the maximum time spent searching for the image before giving up and triggering Not found. This timeout applies only to the block. Each case also has a global timeout configured in Settings; if the case runs longer than that value, it is cancelled even if this block’s timeout has not been reached.
Scroll to find: Enables scrolling while searching for the image when set to a value other than None. This is useful in scrollable content such as pages or documents. The following related properties are available when scrolling is used:
Max repeats: maximum number of scroll attempts before stopping the search.
Amount: the scroll distance per attempt.
Delay (sec): pause between scroll operations.
Await no movement: Delays the search until there has been no movement on the screen for a specified period (for example, 2 seconds). This is helpful when waiting for animations or page loads to settle. Regardless of this setting, the search will start after a maximum wait of about 30 seconds.
Await not found: Inverts the search logic so that the block waits until the image is no longer found on the screen. This is useful when waiting for visual elements such as notifications, loaders, or pop-ups to disappear before continuing.