-
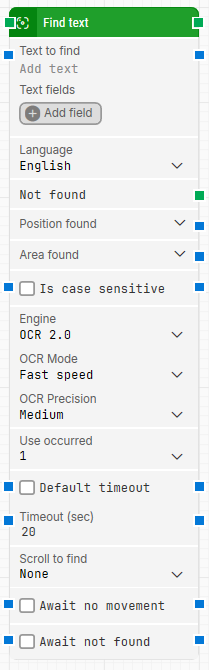
Block header: The green input connector triggers the block to start executing. The green output connector triggers when the text has been found. If Use occurred is set to All, this output connector triggers on each iteration until all occurrences are iterated through. You can rename the block by double-clicking the header text and typing a new title.
-
Text to find: Defines which text to search for. The text can be dynamic by inserting tokens from Text fields. To insert a token, right-click in the field and select Insert token.
-
Text fields: Stores key–value pairs that can be inserted as dynamic tokens into Text to find via Insert token.
-
Language: Selects the language used when recognizing the text.
-
Not found: Triggers if the text is not found before the timeout behavior completes. This is typically used to branch execution flow or explicitly fail a case by linking it to a Fail block.
-
Position found: Outputs the screen position where the text was found as X, Y coordinates. The top-left corner of the screen is 0, 0.
Note that this position is the middle of the found text, not the upper-leftmost pixel of the text. Use the expander to work with X and Y separately.
-
Area found: Outputs the screen area where the text was found as X, Y, Width, Height, starting from the upper-leftmost pixel. The top-left corner of the screen is 0, 0. Use the expander to work with the area’s position and size and their nested sub-properties separately.
-
Area: Limits where the block searches for text using X, Y, Width, Height coordinates, starting from the upper-leftmost pixel. The top-left corner of the screen is 0, 0. If no area is defined, the entire screen is searched. You can enter values manually or right-click and select Capture area. Use the expander to work with the area’s position and size and their nested sub-properties separately.
-
Is case sensitive: Controls whether text recognition should be case sensitive. By default, it is case insensitive.
-
Engine: Selects the OCR engine used for text recognition. Supported options include OCR 1.0, OCR 2.0, and ABBYY.
-
OCR Mode: Selects the OCR recognition strategy.
-
Full mode: Runs four recognition tries in parallel using two different modes (two normal and two inverted colors).
-
Fast speed: Runs two recognition tries in parallel (one normal and one inverted colors).
-
OCR Precision: Controls how strict OCR recognition is on a character level. Higher precision requires higher confidence before a character is accepted, which can reduce false positives but may also miss characters. Lower precision typically returns more characters but with lower assurance. The best setting depends on font, colors, background, and text size.
-
High: Highest confidence/precision. Predefined value is 70.
-
Medium: Medium confidence/precision. Predefined value is 50.
-
Low: Low confidence/precision. Predefined value is 30.
-
Very Low: Lowest confidence/precision. Predefined value is 20.
-
Custom: Sets a custom confidence value from 0–100. A value of 0 returns everything recognized, and 100 returns the best possible recognized result.
If the built-in OCR engine does not meet requirements, ABBYY can be used. Contact Customer Success to get started with ABBYY.
-
Use occurred: Selects which occurrence of the text on screen to use if more than one match is found. Select All to iterate through all occurrences. When All is selected, Current index and Completed are shown.
-
Current index: Outputs the current index while iterating through all occurrences of the text (for example 1, then 2, then 3).
-
Completed: Triggers when iteration through all occurrences has completed.
-
Default timeout: Controls whether the block uses the default timeout from the flow settings or a custom timeout value.
-
Timeout (sec): Sets the maximum time spent searching for the text before the block gives up and triggers Not found. The default value is 20 seconds. This field is used when Default timeout is not selected.
Note: All cases have a global timeout configured in the Settings panel. This is unrelated to the timeout of a single building block. However, a running case will automatically be cancelled if it runs for longer than the global timeout.
-
Scroll to find: Controls whether the block scrolls while searching for the text. This can be useful when searching in scrollable content such as web pages and documents.
-
Max repeats: Sets the maximum number of scroll attempts before the block stops searching.
-
Amount: Sets how much scrolling is performed on each repeat.
-
Delay (sec): Sets the delay in seconds between each scroll amount.
-
Await no movement: Delays the search until there has been no movement on the screen for a specified period (for example, two seconds). This is useful when waiting for a screen update (such as a page loading). Regardless of this checkbox, the search occurs after waiting a maximum of 30 seconds.
-
Await not found: When enabled, the block assumes the text is currently present and waits until it can no longer be found before proceeding. This can be useful when waiting for a “Loading” message or similar indicator to disappear.