The Write SAP Table building block inputs data into rows and columns in an existing SAP table captured from SAP GUI. One limitation is that it cannot write values into fields that use buttons (for example checkboxes, dropdowns, and similar controls).
Note: The screenshot on this page uses the Elegance Design, introduced in 2025.3. If you are using an earlier version, your layout may look different.
Quick-start
Drag Write SAP Table onto the canvas.
Connect the block in the flow and specify the basic parameters required for this block to operate: Select SAP element, Method (and Target if you need a dynamic locator).
Run the flow when it’s ready.
Building block parameters
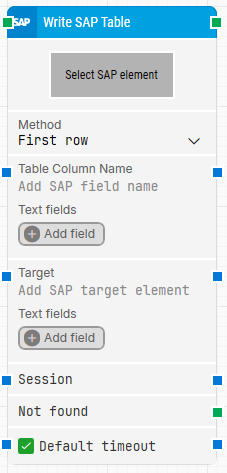
Parameters
Block header: The green input connector triggers the block to start executing. The green output connector triggers when the SAP table has been found and the values have been written successfully. You can rename the block title (“Write SAP Table”) by double-clicking it and typing in a new title.
Select SAP element: Contains the locator for the SAP table element to be found. You can capture it by right-clicking and selecting Capture new element. Once the table is captured, the table columns become available on the block so you can enter values manually or link values in from other blocks.
Method: Defines how the target row is selected for writing:
First row: Always targets the first row.
Row index: Targets a specific row (for example the 5th row).
Table Column Name: Defines which table column the block should write into, based on the SAP field/column name.
Text fields: Stores key–value pairs that can be inserted as dynamic tokens into Table Column Name via Insert token.
Target: The captured SAP target value for the selected table element. This field is editable and can be made dynamic.
Text fields: Stores key–value pairs that can be inserted as dynamic tokens into Target via Insert token. Fields can be renamed by double-clicking them, and inserted tokens update their visual appearance accordingly.
Session: Specifies the SAP session to use, supporting multi-session SAP automation.
Not found: Triggers if the SAP element is not found before the timeout, so you can branch the flow or explicitly fail a case by linking it to a Fail block.
Default timeout: Controls whether the block uses a fixed, local timeout or the flow’s default timeout. If the checkbox is unchecked, you can set the timeout value yourself (default is 10 seconds unless changed manually). If the checkbox is checked, the flow’s Default timeout applies.
Timeout (sec): The maximum time spent trying to find the SAP table element and write the values before giving up and triggering Not found. This value is used when Default timeout is unchecked (default is 10 seconds unless changed manually).