
All three components of the Leapwork Platform Edition can be installed on the following versions of Windows:
-
Window 7 (Service Pack 1)*
-
Windows 8.0 + 8.1
-
Windows 10
-
Windows 11
-
Windows Server 2008 R2
-
Windows Server 2012
-
Windows Server 2012 R2
-
Windows Server 2016
-
Windows Server 2019
-
Windows Server 2022
-
Windows Server 2025
Notes:
-
You may experience performance challenges if you run complex automation flows on Windows 7, due to the operating system’s low memory constraints.
-
The Leapwork Platform edition utilizes the onboard SQLite database.
.png?cb=50195850a609c6b59906ac16ee817630)
Flow
The studio should be installed on the user’s workstation hence its configuration remains the same for Platform and Enterprise editions. The studio is comparable to a normal Office installation, so, in most cases, no special configuration is required. The minimum hardware configuration requirements are:
-
8 GB RAM, 16 GB is recommended.
-
Intel i5 CPU.
-
100 GB SSD-based internal storage.
-
A wired internet connection.
Controller
The Controller is the central hub in the Leapwork system and needs to be configured to accommodate the workload. The workload depends on various factors.
-
The number of automation flows.
-
The complexity and duration of automation flows.
-
The frequency of automation flow execution.
The recommendation is to start with a standard server configuration and monitor the Controller machine's memory usage, I/O activity, CPU usage, etc. The user can then down/upgrade the machine as required. A standard server configuration could be:
-
16 GB RAM.
-
4-8 cores.
-
Flexible and fast disc system (SSD, SAN, or similar. 500 GB to begin with).
The Controller can run on both physical and virtual servers. If you want to install all components on one machine, the following hardware configuration is required:
-
16 GB RAM
-
4-8 cores
-
500 GB SSD
Agent
The Agent is used for executing automation flows. Whilst deploying the Agent in the Data Center, it may not be possible to obtain a Windows desktop version. Therefore, the Agent will also run on a Windows Server with Desktop Experience enabled. The Server is installed on a Windows server. Here is how to choose the configuration for the Agent machine:
-
Simulating applications for an end-user:
In this case, the machine should be as similar as possible to the end-user's machine. This will increase the reliability of the automation flows. However, we recommend that the CPU has at least two cores.
The recommended hardware configuration, in this case, would be:-
8 GB RAM as a minimum; 16 GB is recommended.
-
Intel i5 CPU in a physical machine. In the case of a virtual machine CPU, there should be at least two cores.
-
SSD-based internal storage.
-
-
Running automation flows in parallel:
In the case of executing web automation flows, it is possible to set up an environment that points to a Selenium Grid. Selenium Grid allows multiple browsers to run web automation flows in parallel on the same machine. The more powerful the machine, the more browsers can run in parallel.
In this case, a recommended hardware configuration (assuming 4 parallel browser executions) would be as follows:-
16 GB RAM.
-
4-8 cores.
-
Flexible and fast disc system (SSD, SAN, or similar. 100 GB to start with).
-
Getting Ready for Installation
Download Leapwork
-
Download the latest version of the Leapwork from the Leapwork release page.
-
Keep the downloaded copy of the installer file in all on-prem/remote machines where the Leapwork components installation is to be performed.
.NET Framework
-
Leapwork uses different .NET versions depending on the product version and components being installed.
-
.NET Framework 4.8 is a prerequisite for Leapwork and comes pre-packaged with Windows. For earlier versions, such as 2025.2, .NET Framework 4.8 may need to be downloaded manually from the Microsoft website if it is not already available on the machine.
-
Starting with version 2025.2, Leapwork automatically installs .NET 6 as part of the installation process when required (for Fusion components only).
-
From version 2025.3 onward, Leapwork automatically installs .NET 8 as part of the installation, removing the need for manual installation of newer .NET versions.
Always follow the installer guidance for your specific Leapwork version to ensure the correct .NET components are installed.
-
Access Required to Perform Installation
-
Ensure all local admin rights are available on the controller, agent, and studio machines.
-
Ensure availability of access and authentication information like hostname/IP/credentials for connection to the on-prem/remote machines.
-
Application under test should be accessible from the Agent.
Port and Firewall Opening
-
Open ports 9000 & 9001 on the controller machine.
-
Open port 6777 on all the agent machines. See article: Firewall and port settings before you install Leapwork.
-
Static IP Address or Unique Machine name for the controller machine.
Installation Guide
To get an overview of the components of the Leapwork Platform Automation edition, see Architecture Overview.
Leapwork License Credentials
Notes:
-
Make sure you have credentials to log in to the Leapwork license engine.
-
Contact your customer success manager if you don’t have one.
-
Upgrade the .NET Framework to the latest version.
-
Make sure you have credentials to log in to the Leapwork license engine.
-
Download the latest version of Leapwork. MSI file from the CP download page on all machines where it is going to be installed.
Note: The same MSI installer is used to install the Leapwork Controller, Flow, and Agents.
Controller Installation
-
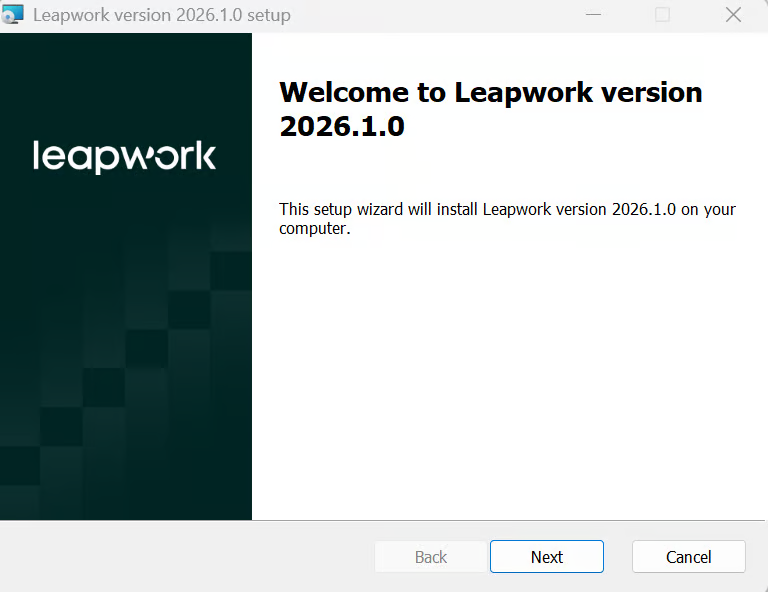
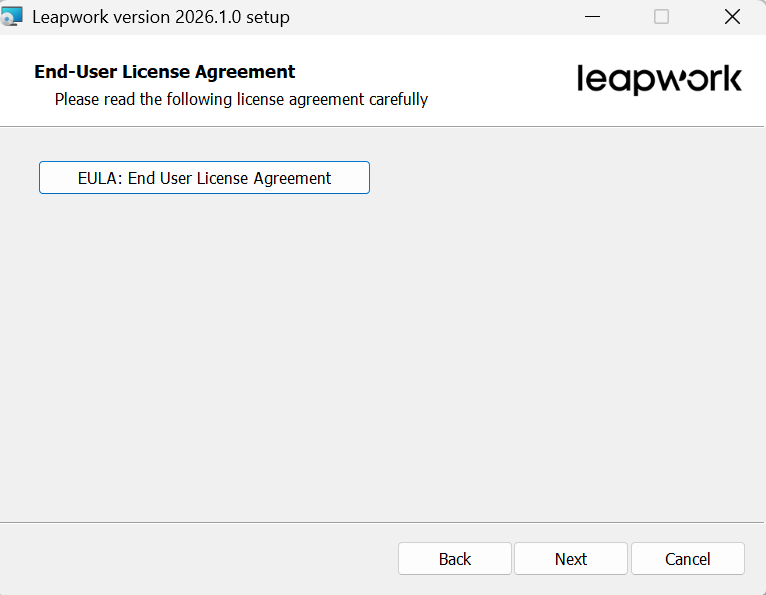
Open the MSI file location and double-click the .msi-file to start the installation. The first screen will display the version number.
-
Click the Next button to begin the installation.
-
Read the end user agreement tick “I accept the terms in the license agreement” checkbox.
-
Click the Next button if you agree.

-
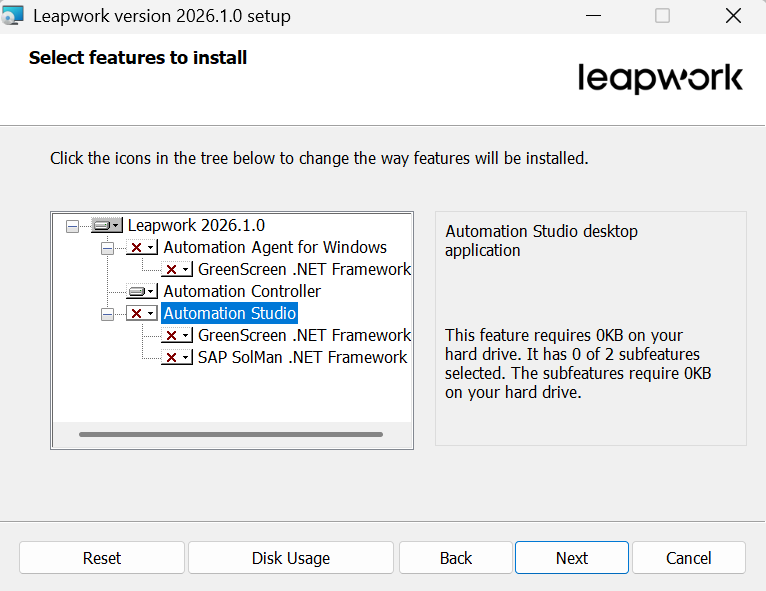
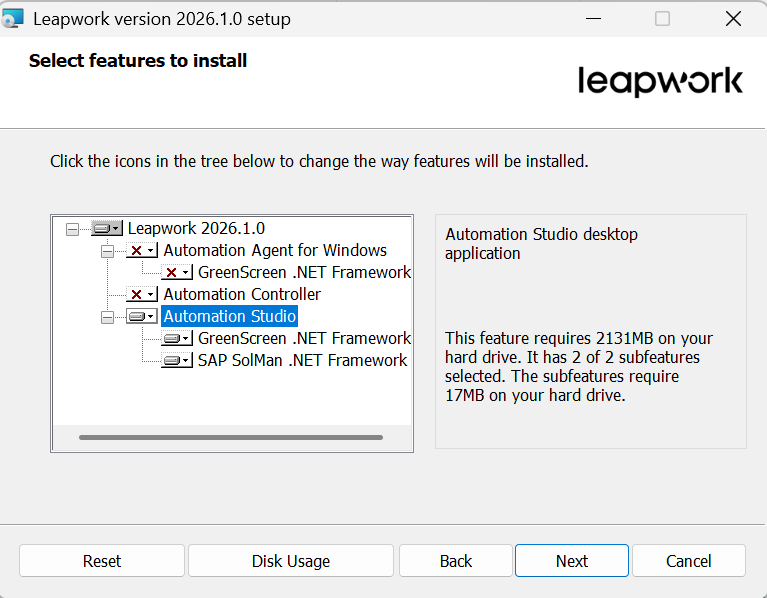
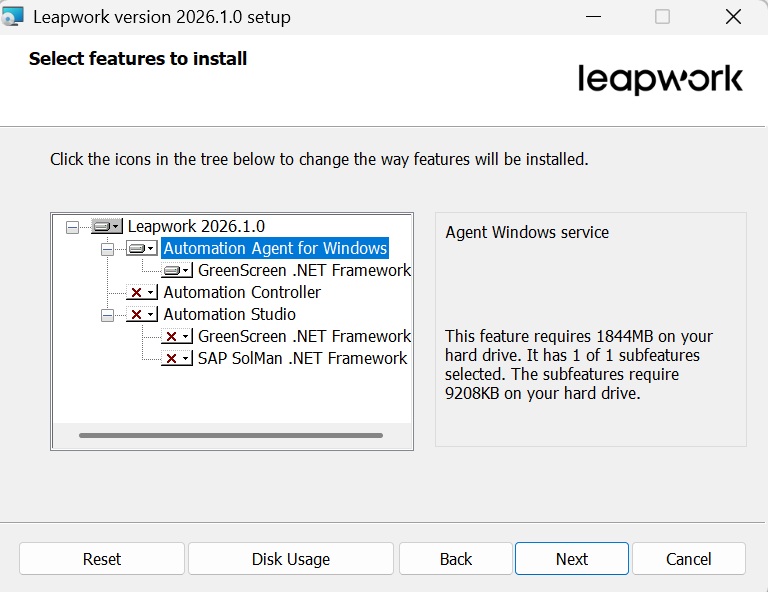
Choose Automation Controller and deselect another two, you can keep studio if you want to keep in controller machine, but we do not recommend having agent installed on controller machine.
-
Click the Next button.
-
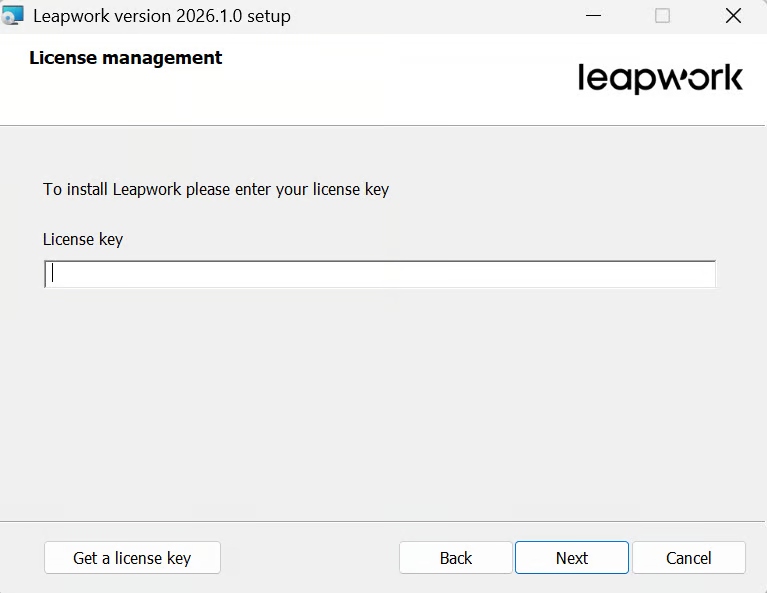
Enter your license key and click Next. To get a license key, click Get a License Key, you’ll be redirected to the Customer Portal.
-
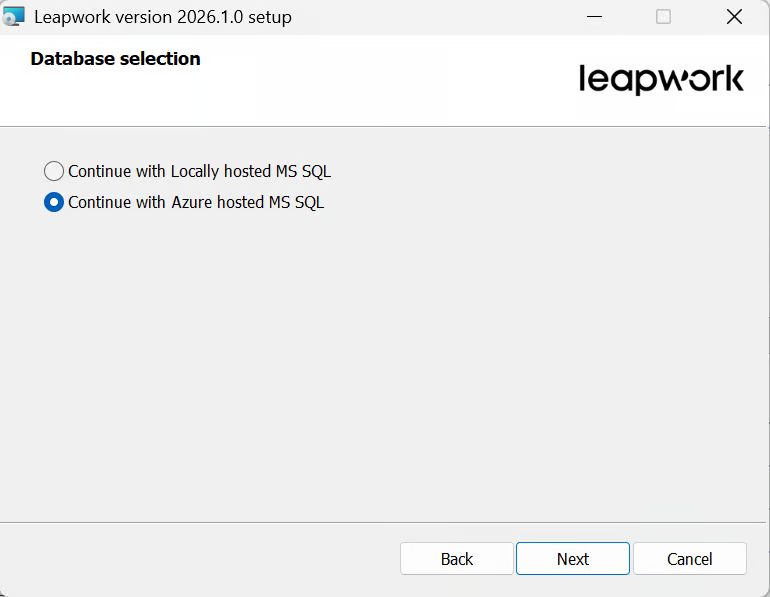
Click Next. The Database Selection page appears.
From the above two options above, choose the option based on the environment where your SQL Server is deployed (for example, on your own server or in the cloud):
-
If SQL server is deployed on-prem; choose the first option (Continue with Locally hosted MS SQL) and click on Next button.
-
If SQL server is hosted on Azure cloud, select the second option (Continue with Azure hosted MS SQL) and click on Next button.
Controller Port
The Flow and the Controller always communicate using internal API calls, and this requires the use of a TCP port. The default is port 9000, which you can change to any other port number that is not in use by other software on your computer.
Controller API Port
For any integration effort, access Leapwork open REST API using the default port number 9001, which you can change to any other port number that is not in use by other software on your computer.
Note: Unless it is necessary for any reason, we do not recommend changing either the Controller or Controller API port numbers.
Path to Videos
This is the path to the file system folder which contains the videos of test results.
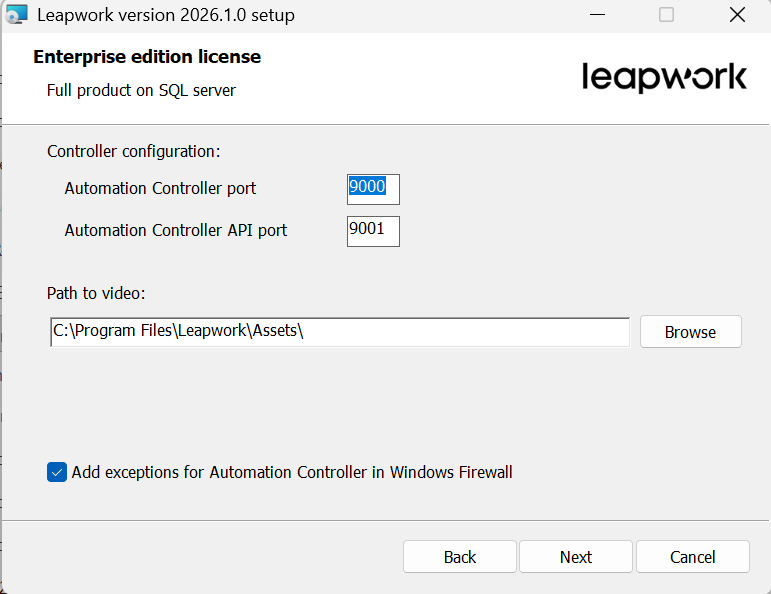
-
Select Add exceptions for Automation Controller in Windows Firewall. This will direct the installation process to add a rule to the Windows Firewall to permit all incoming connections to the Controller.
For the Azure hosted SQL server, below information needs to be provided in the screen:
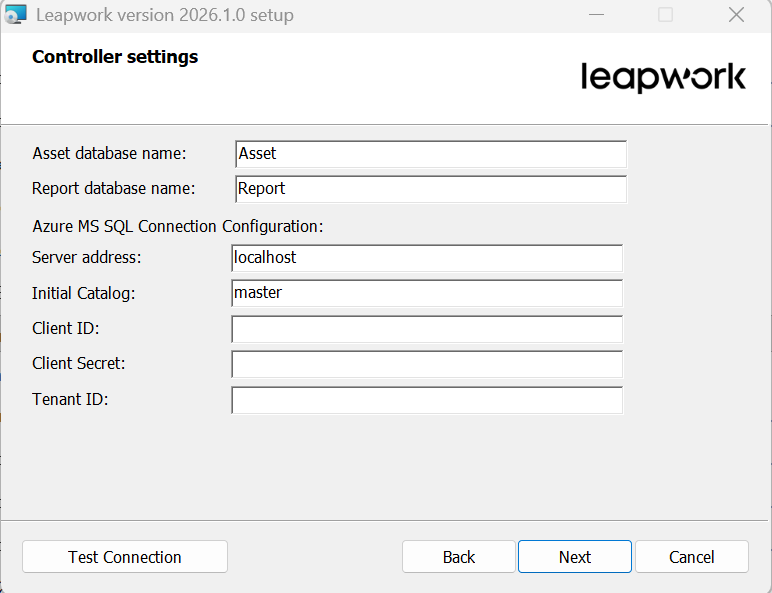
-
Asset Database Name: By default, it is set to "Assets", but you are free to modify it
-
Report Database Name: By default, it is set to "Report", but you are free to modify it
-
Server Address: The user can provide the details of their server address. If it's local then it should be localhost, or you can provide the remote IP address or name of that server
-
Initial Catalog: Provide the Initial Catalog
-
Client ID: Provide your Client ID configured in Azure environment
-
Client Secret: Provide your Client Secret for authentication
-
Tenant ID: Provide your Azure Tenant ID
Note: For getting the details about the Client ID, Client Secret, and Tenant ID, please reach out to your organization's IT admin.
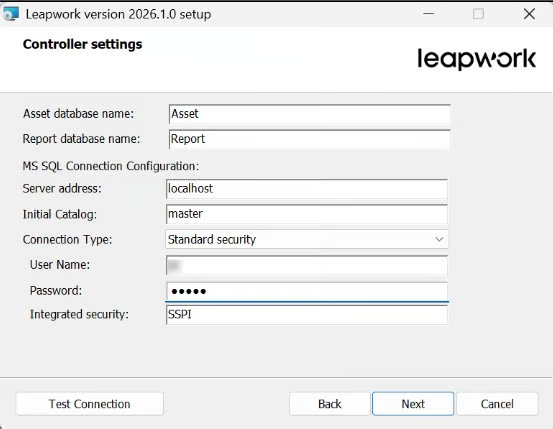
10. Enter information into desired fields and click Next. The SQL server Configuration page appears. The following settings are required to connect Controller with SQL Server.
-
Asset Database Name: By default, it is set to "Assets", but you are free to modify it.
-
Report Database Name: By default, it is set to "Report", but you are free to modify it.
-
Server Address: The user can provide the details of their server address. If it's local then it should be localhost, or you can provide the remote IP address or name of that server.
-
Initial Catalog: Provide the Initial Catalog.
-
Connection Type: Select the desired connection type. (Standard Security for SQL authentication and Trusted Security for Windows authentication).
-
Username: Provide the username of the database.
-
Password: Enter the database password.
-
Integrated Security: You can enter your integrated security. By default, this is set to SSPI.
11. After configuring all settings, click on Test Connection to check everything is correct, if test connection passes, then click Next on the configuration screen.
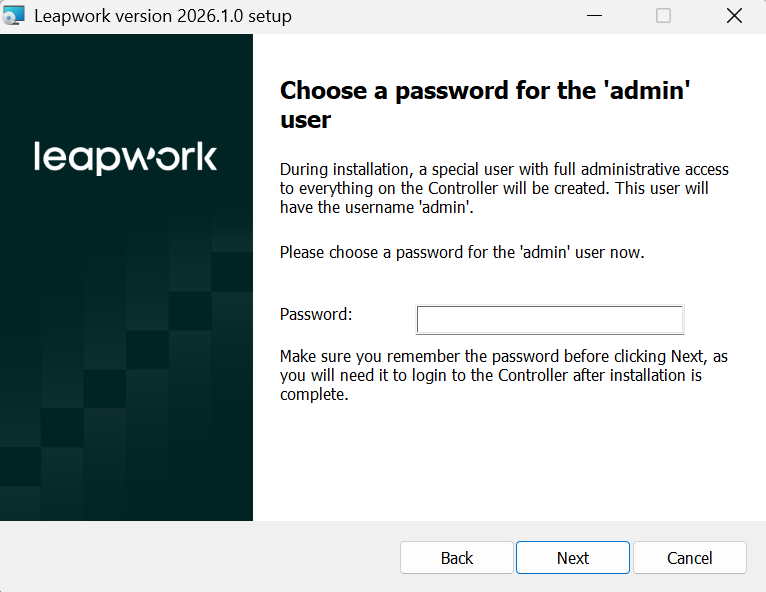
12. Specify a password for the default user (Admin). The Admin user is required for the first login to the Leapwork Flow after installation.
13. Click Next.


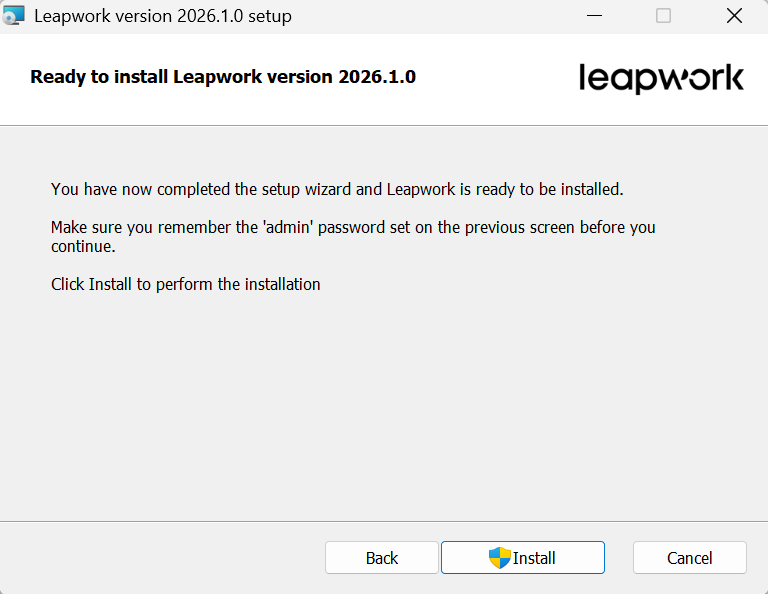
14. Click Install button to complete the installation process.
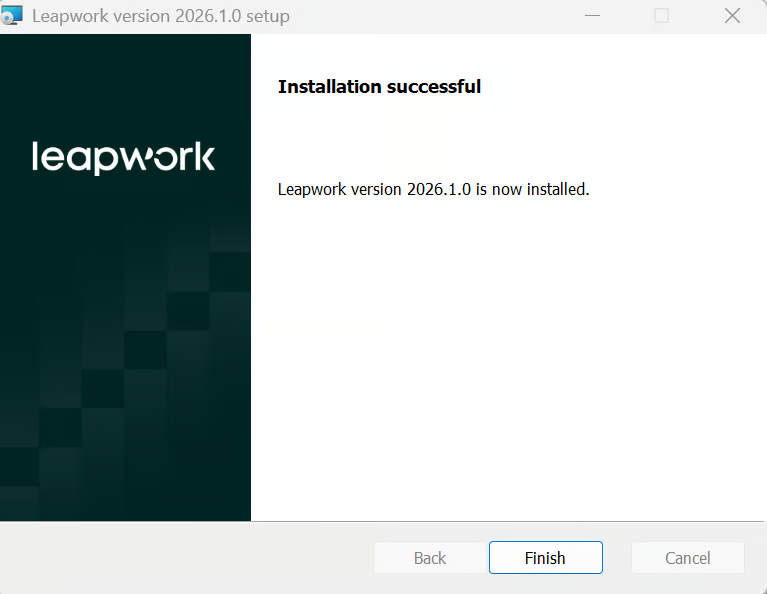
-
Open Leapwork studio.

License Activation
To activate your license, you must obtain it from the CP.
-
Log in to the CP account to download your license. The account is required to access your license.
Note: If you do not have access to the CP, please contact your Customer Success Manager (CSM) to request access or to receive your license.
16. Enter your License Key and click the Validate button, your license will be successfully verified, and you can proceed to complete the Enterprise version installation.
Flow Installation
-
Open the MSI file location and double-click the .msi-file to start the installation. The first screen will display the version number and ensure that the downloaded version fits your computer.
-
Click the Next button to begin the installation.
-
Read the end user agreement by clicking on the EULA tab.
-
Click the Next button if you agree.

-
Choose Automation Flow and deselect other two, you can keep Agent if you want to keep in the same machine, but we do not recommend having an agent installed on studio machine.
-
Click the Next button.
-
Click Next button.
-
Click Next button.

-
Click the Install button to start the installation process.
-
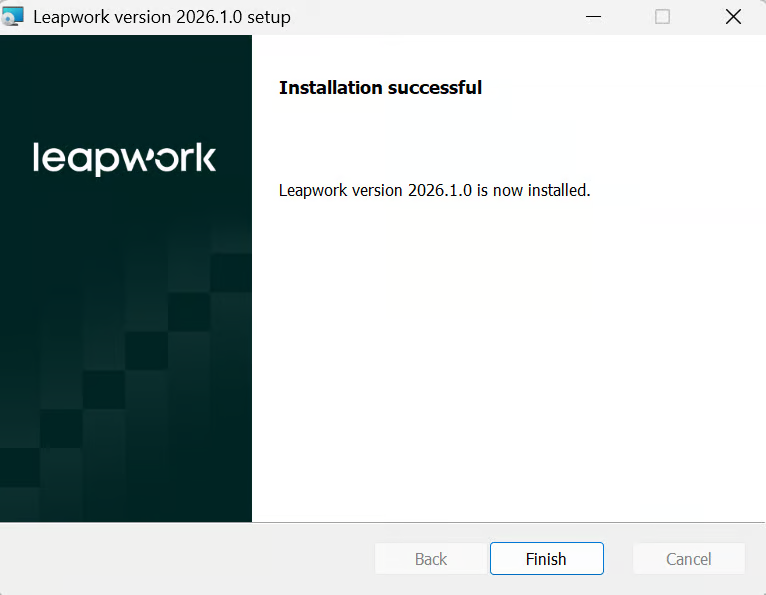
Installation has been completed. Click the Finish button.
Configuring Flow
-
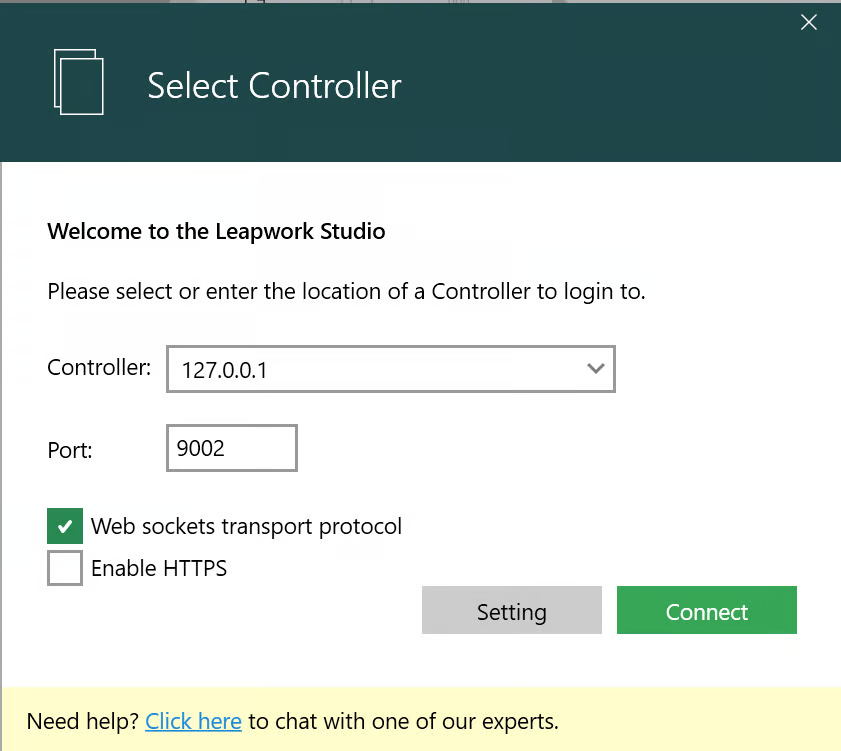
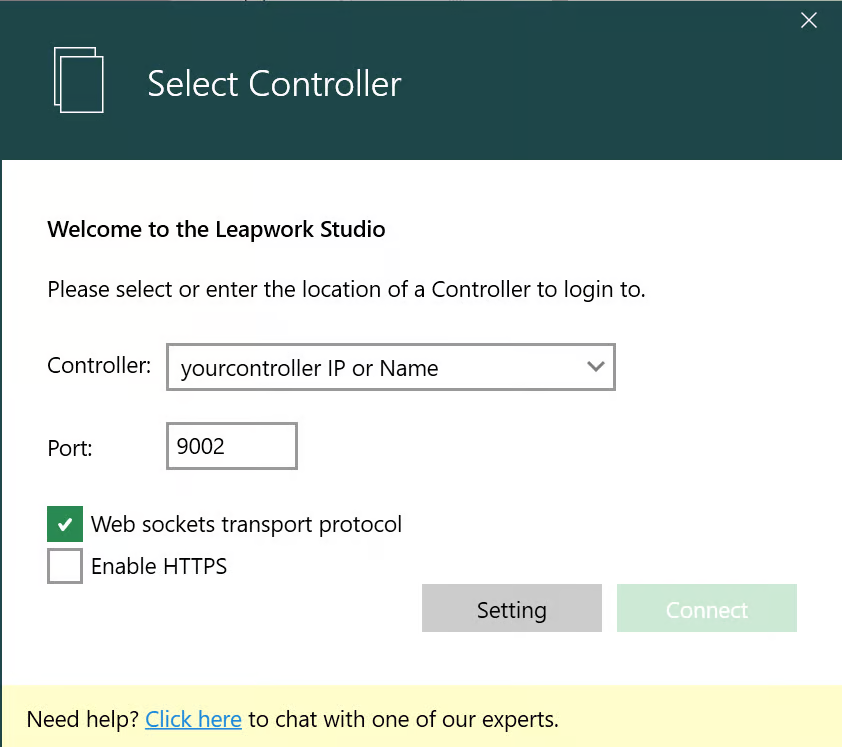
When opening Leapwork studio, Leapwork studio Authentication Window opens:
-
Choose a Controller to select the one used in your organization.
Note: If you can’t find the name of the controller by default, then you can type it manually on the same dropdown control.

-
Change the port number of controller if you have changed it during controller installation.
-
Enable the Web sockets transport protocol checkbox to allow faster communication between Flow, Controller, and Agent.
-
Once you are done with all the above settings, click the Connect button.
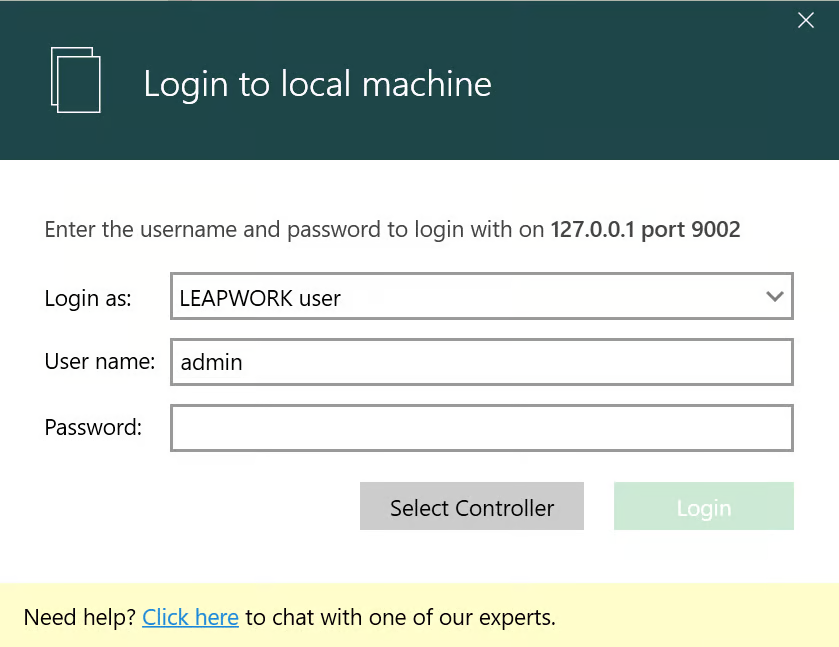
It will return you to the Leapwork Flow Authentication Window. To log into Leapwork for the first time, use your admin credentials in this window.
-
Enter the credentials and press the Login button.
Leapwork Administration
As an admin, you have access to Leapwork Administration, and you can perform actions shown below:
-
Controller Settings: Change controller settings
-
User Management: Add, Remove, Update Leapwork Users
-
Team Management: Add, Remove, Update Leapwork Teams
-
Workflow Settings: Edit Workflow settings
-
API Access Keys: Generate API Keys
-
E-Mail Settings: Update email settings that use to send email from Leapwork
-
Proxy Settings: Update Leapwork proxy settings
-
Default Automation Flow Settings: Update flow settings
-
Capture Settings: Change the way Leapwork captures an object
-
Retention Policies: Add, Remove, Update Leapwork retention policies
-
License Management: License management, Add, Remove, and Update Leapwork licenses
-
Audit Log: Check Audit logs
Agent Installation
-
Open the MSI file location and double-click the .msi-file to start the installation. The first screen will display the version number and ensure that the downloaded version fits your computer.
-
Click the Next button to begin the installation.

-
Read the end user agreement tick “I accept the terms in the license agreement” checkbox.
-
Click the Next button if you agree.
-
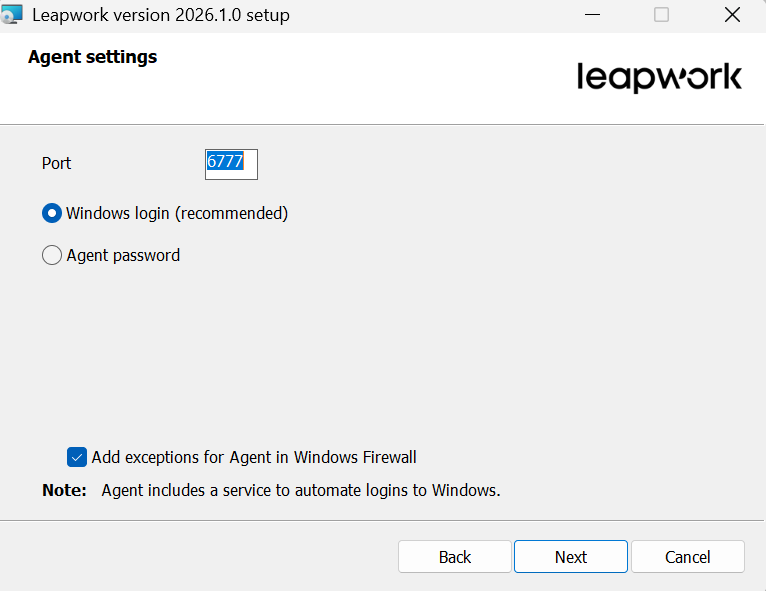
Choose Automation Agent and deselect another two, we do not recommend having Flow or controller installed on Agent machine.
-
The configuration screen contains several settings that you can modify before completing the installation.
-
Click the Next button after choosing your desired configuration.
-
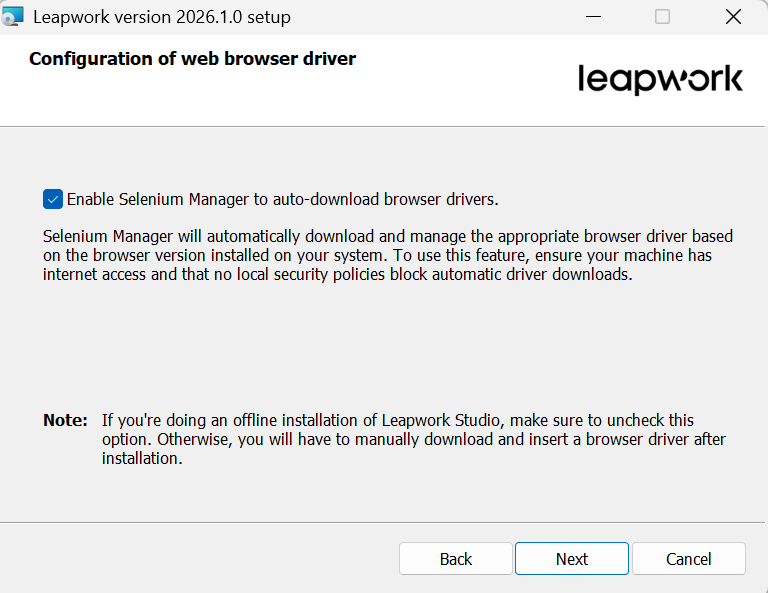
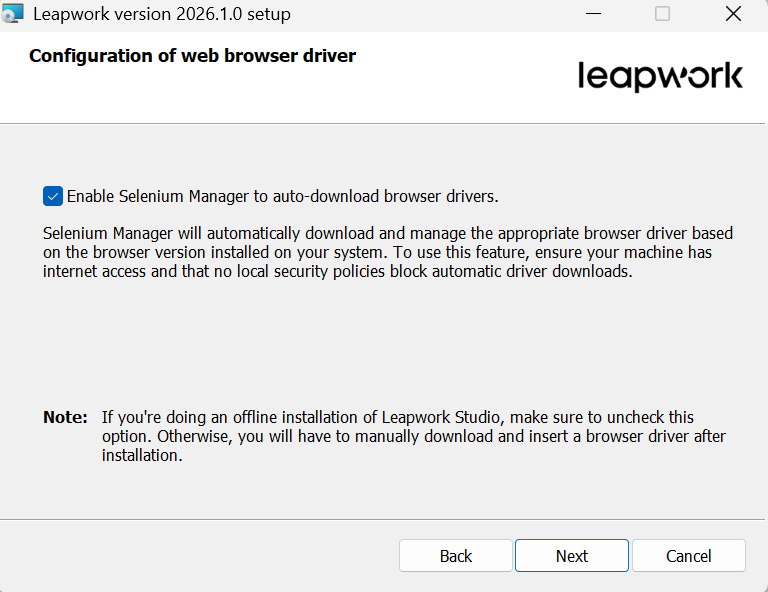
Check Enable Selenium Manager to auto-download browser drivers if you want Leapwork Flow to automatically download the matching browser drivers from the internet during runs. Otherwise, leave it unchecked to use the packaged drivers installed locally, then click the Next button.
-
Click the Next button and then press Install to start the installation process.

-
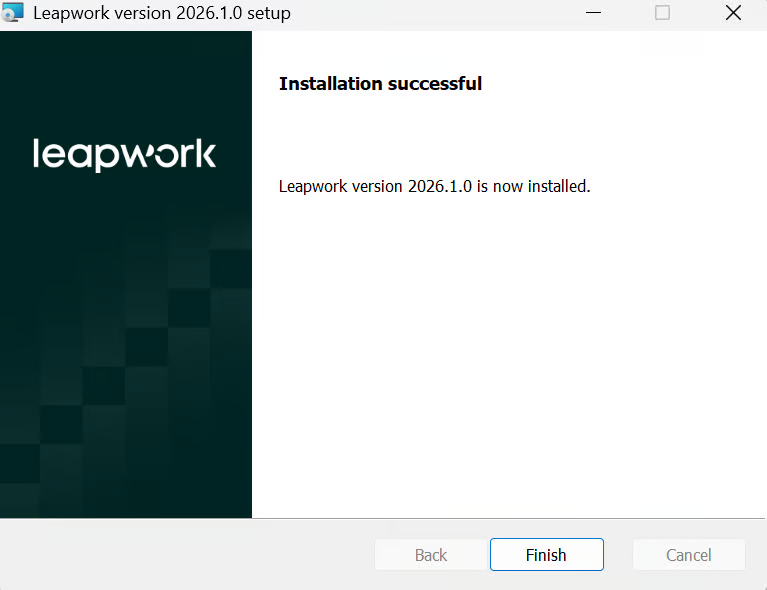
Click the Finish button to complete the installation.
-
To configure the Agent, go to the Flow machine and complete the configuration using Leapwork Flow.
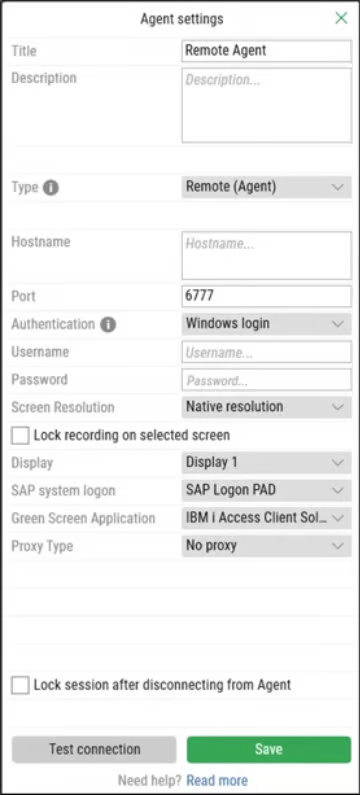
For step-by-step instructions, see the article on configuring an Agent after installation.
For any clarification, please contact on Priority Support.