Introduction
Leapwork offers the Mobile Automation feature. This feature enables you to run automation on mobile devices.
You can connect to cloud devices alongside native mobile devices to run the flows. The connection details for cloud devices are explained in the below sections in detail.
Objective
The main objective of this feature is to support mobile automation on both iOS and android devices, the benefits of which are listed below:
-
Enables you to execute end to end mobile testing much faster than manual execution methods
-
Allows you to run flows on multiple devices
-
Provides the option to run flows on physical and on-prem devices
Instructions for Installation
Leapwork supports mobile automation on native devices Appium and HeadSpin. Below are the instructions to install and run mobile automation on Android and iOS devices.
Android Device
Leapwork does not support the installation of Appium and mobile devices. You should have Appium pre-installed. Now, run the latest version of Leapwork platform installer. Upon successful installation, the mobile automation blocks will be ready for use on Android device.
iOS Device
Leapwork does not support the installation of Appium and mobile devices. The client should have Appium pre-installed. Now, run the latest version of Leapwork platform installer. Upon successful installation, the mobile automation blocks will be ready for use on iOS device.
Connections
The Connection tab lets you set up a connection to different servers. Multiple connections can be created and saved which can be used for running the flow.
Leapwork Mobile automation supports two different ways to set up a connection:
HeadSpin Server Connection
With HeadSpin Server, you don’t need to worry about setting up or maintaining physical mobile devices yourself. It’s a cloud-based automation framework that lets you test your Android and iOS apps on real devices hosted in the cloud. Using WebDriver, you can interact with those devices just like you would locally, except without the overhead of managing a local Appium server. This makes mobile testing simpler, faster to scale, and much easier to maintain.
Notes:
-
A separate HeadSpin subscription is required.
-
Only Leapwork Admins can configure HeadSpin connections.
Add a HeadSpin Connection
To add a connection in Leapwork Flow:
-
Click the Add button.
-
In the Add Connection pop-up window, fill in the following fields:
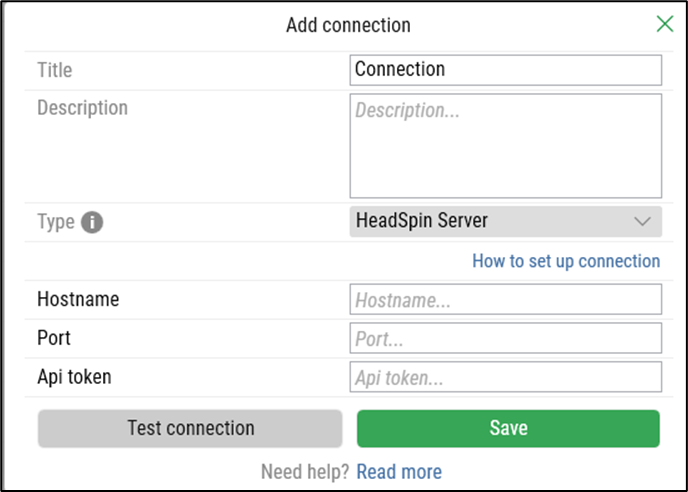
-
Title: Enter a unique name.
-
Description: Provide a short description.
-
Type: Select HeadSpin Server.
-
Hostname: Enter the hostname provided by HeadSpin.
-
Port: Enter the port number configured in HeadSpin.
-
API Token: Enter your HeadSpin API token.
-
Click Test connection to verify.
-
Click Save to confirm.
-
Click Test connection to verify the connection established.
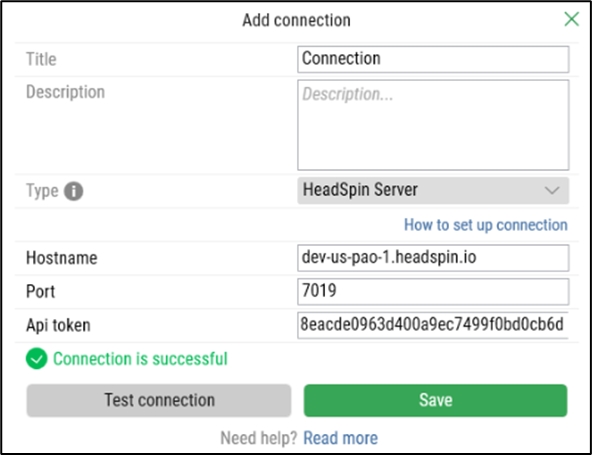
A success message appears when the connection is active.
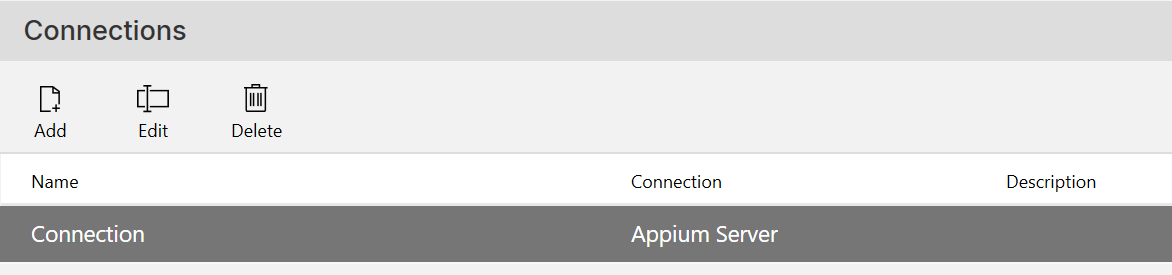
To update or remove a connection, you can use the Edit or Delete buttons.
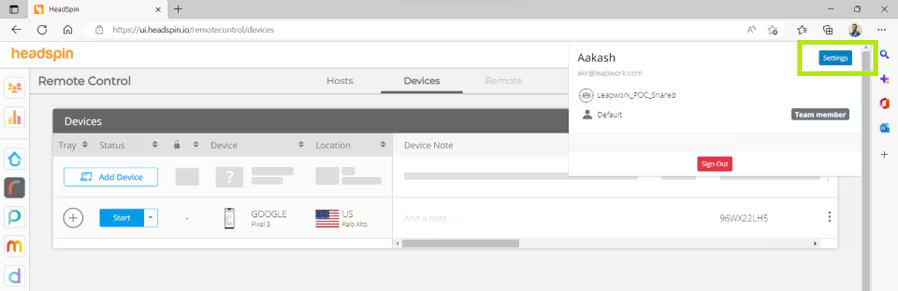
Where to Find Hostname, Port, and API Token in HeadSpin
If you’re not familiar with HeadSpin, here’s how to retrieve the required details:
-
Hostname & Port:
-
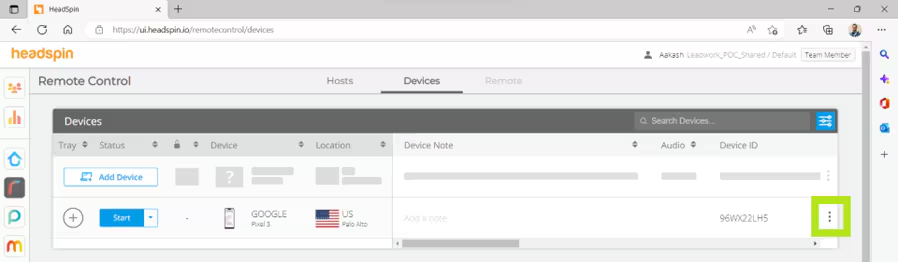
Log in to HeadSpin.
-
Go to the Remote-Control page.

-
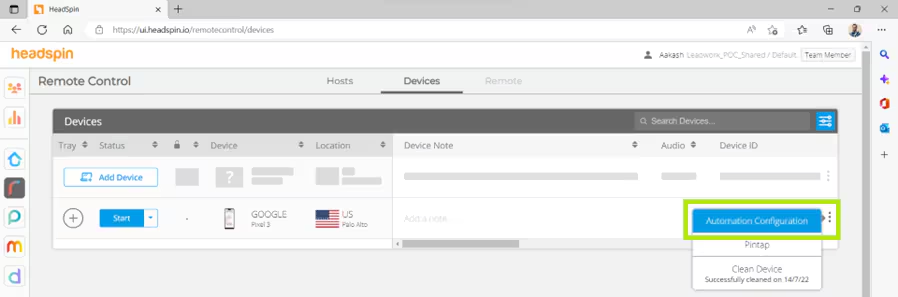
Open More Actions (⋮) → Automation Configuration for your device.
-
In the WebDriver URL, you’ll find:

-
Hostname (e.g.,
dev-us-pao-1.headspin.io) -
Port (e.g.,
7019)
-
-
-
API Token:
-
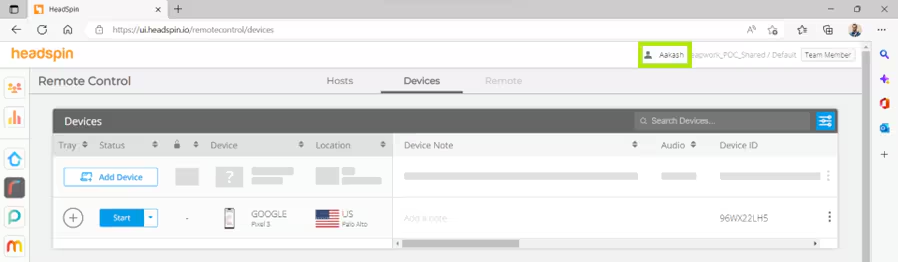
Click your profile name in the top-left of HeadSpin.
-
Go to Settings.
-
Click + New Token to generate a token.

-
-
Device details (Name, Platform version, UDID):
-
Available under Automation Configuration → Device.

-
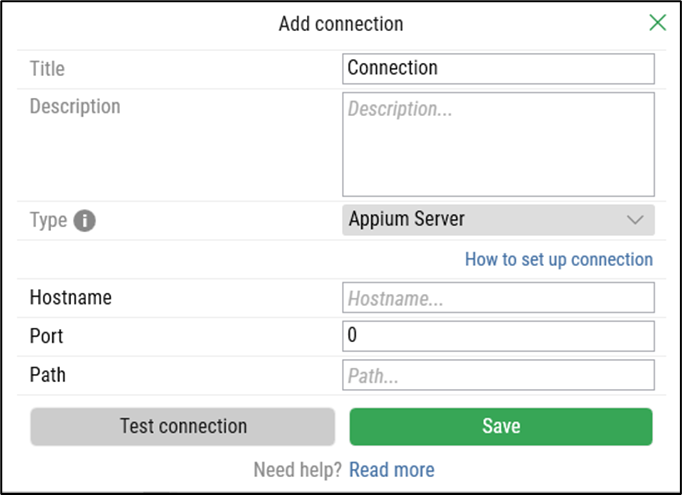
Appium Server Connection
The Appium Server connection is used for automating mobile testing on iOS and Android. It drives native mobile applications using WebDriver.
To use this connection type, you must have an Appium server installed on a host that is accessible from Leapwork.
Note: This feature can be accessed by Leapwork Admins only.
Add Connection
To add an Appium Server connection in Leapwork Flow:
-
Click the Add button.
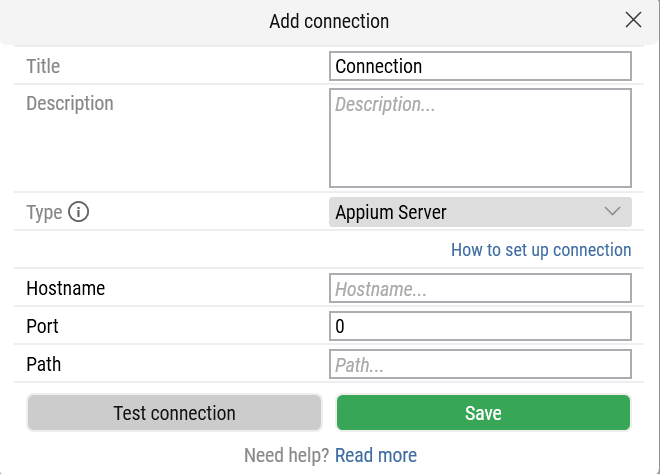
In the Add Connection pop-up window, fill in the following fields:

-
Title: Enter a unique name.
-
Description: Provide a short description.
-
Type: Select Appium Server.
When you select Appium Server, new fields appear:
-
Hostname: The host of the Appium server (IP address or hostname).
-
On iOS devices: Go to Settings → General → About for hostname, or Settings → Network → active network → Properties for IP.
-
On Mac: Go to System Preferences → Network, select Wi-Fi/Ethernet, and copy the IP address.
-
On Windows hosts: Go to Settings → System for hostname, or Settings → Network & Internet → Properties for IP address.
-
-
Port: The port configured in Appium (default:
4723). -
Path: Default is
/wd/hub.
Note: If you use Appium 2, the base path is now/.
-
Click Test connection to verify.
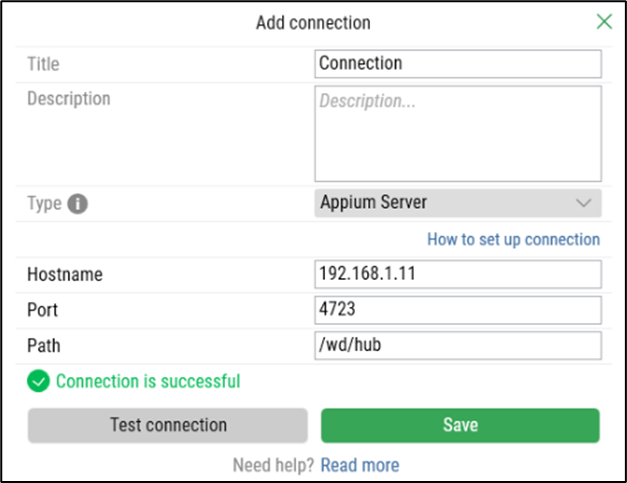
-
Click Save to confirm.
A success message appears when the connection activates.
To update or remove a connection, you can use the Edit or Delete buttons next to the Add button.
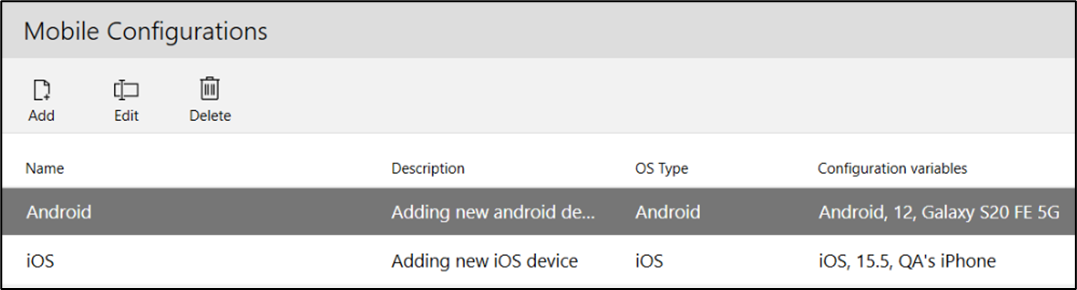
Mobile Configurations
Once a connection is established, the Mobile Configurations tab allows administrators to add and manage mobile devices (phones, tablets, etc.) for automation.
Note: You must define a connection before adding any mobile devices. Only administrators can access Mobile Configuration settings.

Leapwork supports two mobile configuration types:
-
iOS Device
-
Android Device
Note: If you're using an Appium server connection, ensure all devices are also registered on the Appium server before adding them to Leapwork.
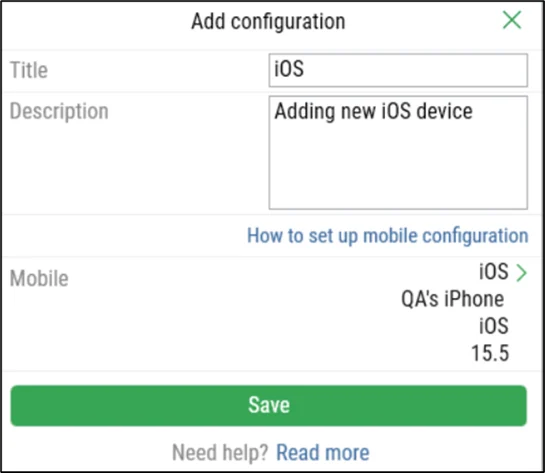
iOS Device Configuration:
-
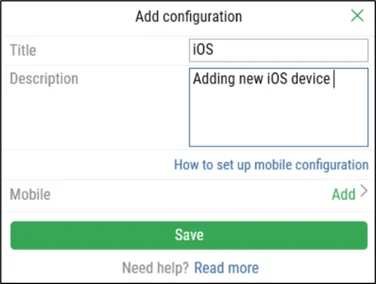
In the Mobile Configurations tab, click Add.
-
Enter a unique Title and a brief Description.
-
Click Add next to Mobile to open the configuration form.
-
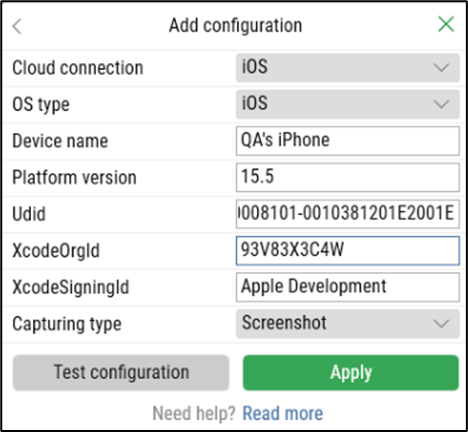
Fill in the fields:
-
Cloud connection: Select the desired connection.
-
OS type: Choose the operating system. This information is available on either the physical device or the HeadSpin device information.
-
Device name: Enter a name for the device.
-
Platform version: Specify the OS version. This information is available on either the physical device or the HeadSpin device information.
-
UDID: Enter the device's UDID.
-
XcodeOrgId and XcodeSigningId: Retrieve these from your Apple Developer account.
-
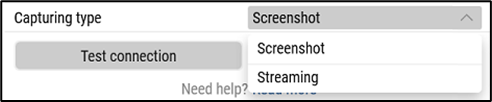
Capturing type:
-
Screenshot: Captures screenshots per block. Recommended for most use cases.
-
Streaming: Captures full-frame video. Requires more bandwidth and storage.
-
-
-
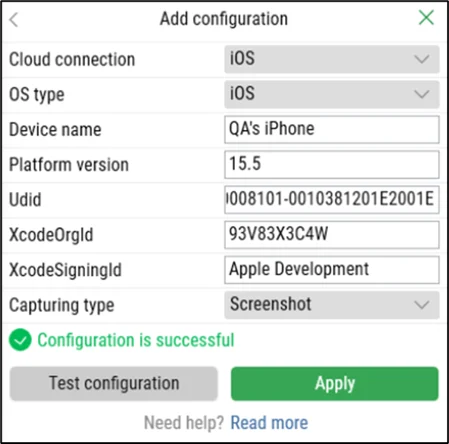
Click Test configuration to verify the setup.
-
Click Apply to register the changes.
-
Click Save.
A confirmation message appears and the new configuration is listed under Mobile.
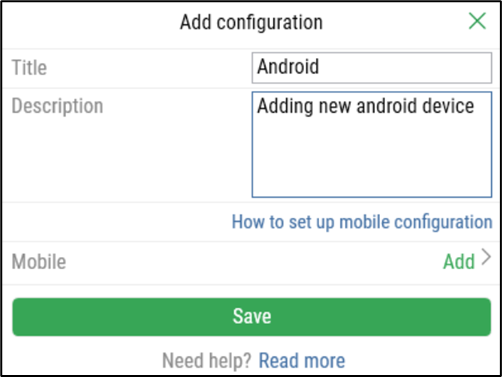
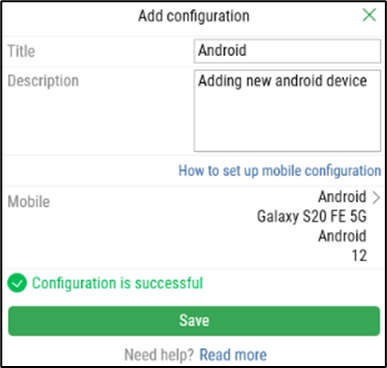
Android Device Configuration
-
Open the Mobile Configurations tab and click Add.
-
Provide a unique Title and a short Description.
-
Click Add next to Mobile to open the configuration form.
-
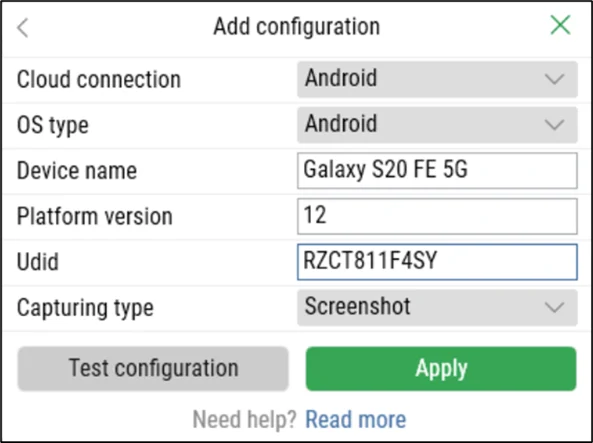
Fill in the fields:
-
Cloud connection: Select the desired connection.
-
OS type: Choose the operating system. This information is available on either the physical device or the HeadSpin device information.
-
Device name: Enter a name for the device.
-
Platform version: Specify the OS version. This information is available on either the physical device or the HeadSpin device information.
-
UDID:se the command
adb devicesin the terminal to retrieve it. -
Capturing type:
-
Screenshot: Captures screenshots by block. Recommended for most cases.
-
Streaming: Captures full-frame video. Requires more bandwidth and storage.

-
-
-
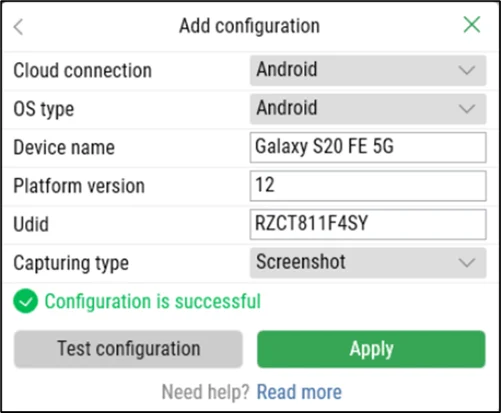
Click Test configuration to verify the setup.
-
Click Apply to register the changes.
-
Click Save.
A confirmation message appears and the new configuration is listed under Mobile.
To edit or delete a configuration, use the Edit or Delete buttons beside the mobile device entry.