Send E-Mail

The Send e-mail block is used to send an email while a case is running. This is useful for office automation, notifications, monitoring flows, or adding extra logging and debugging information.

To use this block, an e-mail connection must be configured and working in Email settings. Add the link to the Email settings article here so users can access the configuration steps.

See the HTTP Request lesson for an example of how to use the Send E-mail block in a flow.

It should be noted that “scheduled actions” in the Scheduler can also send e-mail when an automation case is completed. This is typically more useful for reporting failures. Take the Schedule and reports lesson to learn how to configure e-mail as part of a schedule.

Fully expanded, the Send e-mail block looks like this:

image-20260119-081150.png

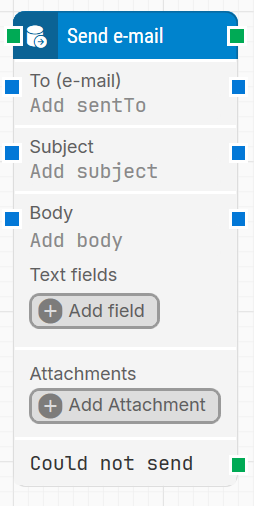
Note: The screenshot on this page uses the Elegance Design, introduced in 2025.3. If you are using an earlier version, your layout may look different.

Quick-start

  1. Drag Send e-mail onto the canvas where you want the message to be sent in the flow.

  2. Specify the main email fields, at minimum To (e-mail), Subject, and Body, and optionally add Text fields for dynamic content and Attachments.

  3. Run the flow when it’s ready; the email is sent when the block executes, and you can branch on Could not send if delivery fails.

Building block parameters

Parameters
  • Block header: Shows the current name of the Send e-mail block. You can rename it by double-clicking the header and typing a new title. The green input connector starts the send operation when the flow reaches this block, and the green output connector triggers when the email has been sent successfully.

  • To (e-mail): Specifies the recipient email address (or addresses).

    • You can type the address directly or feed it in dynamically from other blocks via the blue input connector.

    • The value can also be passed on to other blocks using the blue output connector.

  • Subject: Defines the subject line of the email.

    • Can be entered manually or injected dynamically from other blocks.

    • The subject value can be reused downstream via the blue output connector.

  • Body: Contains the main content of the email.

    • You can type the message directly or populate it dynamically from other blocks.

    • The body text can also be passed to other blocks through the blue output connector.

  • Text fields: Adds dynamic fields that can be referenced in To, Subject, and Body.

    • Click Add field to create a field.

    • To insert a field value, right-click in Subject or Body, choose Insert token, and select the field name.

    • Fields can be renamed by double-clicking them; any tokens using that field are updated automatically.

  • Attachments: Lets you include files with the email.

    • Click Add Attachment to add one or more files.

    • Attachments can also be supplied dynamically via the input connector.

    • To remove an attachment, click the X icon next to the file.
      Note: Available from release 2025.1 onward.

  • Could not send: Green output connector that triggers if the email cannot be sent, for example due to an invalid address, network issues, or authentication errors. Use this connector to branch the flow when sending fails, for logging, retries, or alternative handling.

Resources

Topic

Description

Flows FAQ

Common questions about creating, running, and managing flows in Leapwork.

Flows Troubleshooting

Guidelines and solutions for identifying and fixing issues that occur when building or running flows in Leapwork.