
The Write Excel block writes data into an Excel file. After you select a header range, the block lets you insert or append data under those columns based on the fields you connect in the flow.
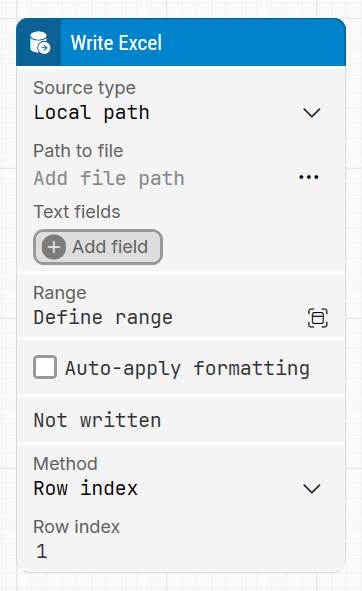
When fully expanded, the following is an example of the Write Excel block:
Note: The screenshot on this page uses the Elegance Design, introduced in 2025.3. If you are using an earlier version, your layout may look different.
Quick-start
-
Drag Write Excel onto the canvas.
-
Connect the block in the flow and set the key parameters, such as Source type, Path to file or Cloud file properties (Connection, Site URL, File Name), Range, Method, then connect the column fields you want to write.
-
Run the flow when it’s ready.
For a minimal setup, point the block to an existing Excel file, define a Range, keep the default Method, and map only the columns you need.
Building block parameters
Parameters
-
Block header: Shows the current name of the Write Excel block. You can rename it at any time by double-clicking the header and entering a new title to keep flows readable and organized.
-
Source type: Defines where the Excel file is stored. Options include:
-
Local path: the file is referenced from a path on disk or a network share.
-
Cloud file: the file is accessed from an external cloud service (currently SharePoint) using a configured connection.
Note: Available from 2025.1.173 onward for local and remote agents, and extended to cloud agents from 2025.3.0 onward.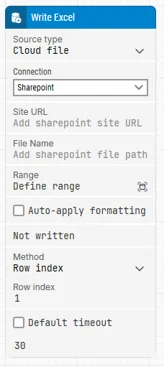
-
-
Path to file: When Source type is Local path. Clicking the ellipsis button opens a file dialog where you can choose the Excel file, including files on shared network paths. Once selected, the full path appears in the text box.
Because the file is not stored in Leapwork, you can update its content directly at that path and the block will write to the updated file. -
Text fields: Lets you define key–value fields whose values can be inserted as tokens into Path to file.
-
Add fields for dynamic parts of the path (for example, environment or date folders).
-
Right-click in Path to file and choose Insert token, then select a field name to include its value.
Renaming a field updates all tokens that reference it, making it easy to maintain dynamic paths.
-
-
Connection: Used when Source type = Cloud file. Lists available configured connections, currently SharePoint Connection.
A SharePoint connection must be configured in advance to use this parameter. Follow the instructions in the Microsoft Graph connection guide to set up the connection.
Note: Available from 2025.1 onward. -
Site URL: Specifies the SharePoint site or sub-site where the Excel file is stored (for example,
https://company.sharepoint.com/sites/FinanceTeam).
This field is mandatory when Source type = Cloud file, and must contain a valid.
Note: The URL must be correctly formatted to match the SharePoint environment. -
File Name: Defines the name of the Excel file within the selected SharePoint site, including its extension (for example,
Quarterly_Report.xlsx). After Site URL is set, this field points the block to the exact file to write to.
Note: The file must exist in the specified SharePoint site, and the user must have write permissions. If the file is moved or renamed, the connection may fail. -
Range: Selects the sheet and cell range in the Excel file where data will be written.
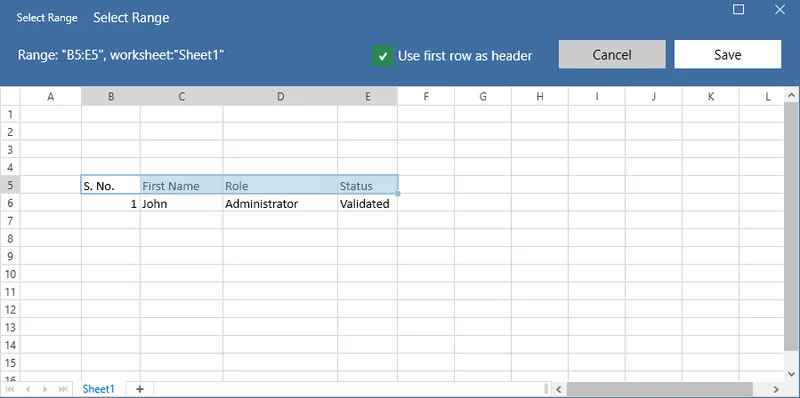
Clicking Define range opens the Select Range popup, where you choose the columns and rows to use.-
You can select data from any sheet but only one range per Write Excel block.
-
Check Use first row as header in the popup if you want the first row’s column values (for example, S. No., First Name, Role, Status) to become field names in the block.
-
-
Auto-apply formatting: Controls how cell formatting is applied when values are written:
-
Checked: the block detects the data type (decimal number, integer, date, or text) and applies the corresponding Excel cell format automatically.
-
Unchecked: all values are written as text without automatic formatting.
-
-
Not written: Triggers if the block cannot write to the Excel file or if the file cannot be found. You can connect this output to branch the flow, for example to log an error, attempt recovery, or fail the case explicitly.
-
Fields (named columns): Once the Excel file is loaded and a Range is selected, each column in that range appears as a field on the block with its header name.
-
Connect values to these fields (from other blocks or tokens) to insert or update data in the corresponding columns.
-
These fields act as data connectors, making it easy to map flow values into the Excel sheet.
-
-
Method: Specifies how rows are chosen for writing data:
-
Row index: writes to a specific row within the selected range.
-
Append: writes to the first empty row after the existing data in the selected range.
-
-
Row index: Used when Method = Row index. Indicates which row number within the selected range should receive the data (for example,
1for the first row of the range,5for the fifth).
Resources
|
Topic |
Description |
|---|---|
|
Common questions about creating, running, and managing flows in Leapwork. |
|
|
Guidelines and solutions for identifying and fixing issues that occur when building or running flows in Leapwork. |
|
|
Configuration and usage of the SharePoint connection in Leapwork to read from and write to Excel files stored in SharePoint. |