The D365 Select Row block selects a specific row inside a table or grid in a Dynamics 365 Finance & Operations application. The block is automatically created when you select a row while recording with the Fusion Recorder.
It allows your automation flow to work at row level, so you can perform actions such as clicks, edits, validations, or nested steps within the context of the selected row.
Note: This block works only in browser windows launched using the Login block or within the current D365 recording session.
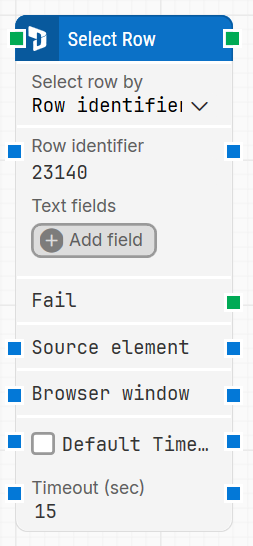
Fully expanded, the D365 Select Row block shows the following properties:
Note: The screenshot on this page uses the Elegance Design, introduced in 2025.3. If you are using an earlier version, your layout may look different.
Quick-start
Use the D365 Fusion Recorder and select a row in the D365 F&O grid/table so the recorder generates the D365 Select Row step.
Stop the recording, review and optionally adjust the generated step (for example, Select row by, Row identifier / Row index / Row text, and timeout-related settings), then save the recording so the full recorded flow is added to the canvas.
Run the flow when it’s ready.
Building block parameters
Parameters
Block header: Shows the current title of the block. The title is automatically named based on the selected method and context (for example, “Select Row 3” or “Select Row by Account ID”), but you can edit it by double-clicking the title.
Select row by: Defines how the block locates the row within the grid.
Row identifier: Locates the row using a specific field value (for example, an ID or label).
Row index: Selects the row by numeric position, starting from 1.
Row text: Locates the row based on visible text content within the row.
Row identifier / Row index / Row text: This field adapts based on the option selected in Select row by.
When Row identifier is selected, enter the value that uniquely identifies the row.
When Row index is selected, enter the numeric position of the row (starting from 1).
When Row text is selected, enter the text content that should match the target row.
Text fields: Optional fields used to narrow down or support row selection. Click Add field to define additional matching criteria. These fields store key–value pairs, and the values can be inserted as dynamic tokens into other fields via Insert token.
Fail: This output connector is triggered if the row cannot be found within the specified timeout. Use it for conditional handling or fallback logic.
Source element: Optionally limits the row locator to a previously captured parent element. For example, if the grid is inside a specific form or section, referencing the parent element ensures the locator focuses only within that scope. In Early Access versions, this setting is not yet configurable.
Browser window: Defines the browser window instance where the row selection is performed. In Early Access versions of the Smart Recorder, only a single browser window is supported, so this field is not user-configurable.
Default timeout: Controls whether the block uses the default timeout from the flow settings or a custom timeout value.
Timeout (sec): Sets the maximum time allowed to locate the specified row before the block gives up and triggers the Fail connector. This field is used when Default timeout is not selected.