The Login block automates signing in to a Dynamics 365 Finance & Operations (D365 F&O) application. It starts a browser, navigates to the specified D365 URL, and performs the login steps according to the selected login method so that later blocks can run in an authenticated D365 session.
Note: The screenshot on this page uses the Elegance Design, introduced in 2025.3. If you are using an earlier version, your layout may look different.
Quick-start
You can start a D365 login session in two main ways, depending on how you want to work with the Fusion Recorder.
Option 1 – Start from the D365 F&O Fusion Recorder
Right-click on the canvas and choose Add building block > Recorders > Start D365 F&O Recorder.
In the Login modal that appears, fill in the basic authentication fields you need, then start the recorder.
The selected browser is launched with the Fusion Recorder attached and a logged-in D365 session. When you stop recording, the Login block and the recorded steps are added to the flow automatically.
Option 2 – Use the Login block directly in a flow
Drag Login onto the canvas.
Configure the core parameters on the block.
Run the Login block or the flow up to this step to open the browser and complete the login. Once the browser is open and authenticated, start the D365 Fusion Recorder (for example from Recorders > Start D365 F&O Recorder) to record additional steps against that running session.
Building block parameters
Parameters
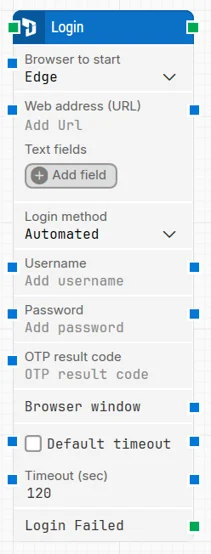
Block header: Shows the current name of the Login block. You can rename it by double-clicking the header and entering a more descriptive title (for example, Login – D365 Finance UAT).
Browser to start: Selects which browser will be launched for the login sequence (for example, Edge). The chosen browser is used for all subsequent D365 web interactions in this flow.
Web address (URL): Specifies the D365 application URL to open when the block executes.
The URL should point directly to the intended D365 environment or login endpoint for authentication to succeed.
Text fields (for URL): Lets you define fields that hold dynamic values to be used inside the URL.
Add one or more fields and assign values (for example, environment name or tenant).
Right-click in Web address (URL) and choose Insert token to inject these field values into the URL.
Login method: Defines how authentication is performed:
Automated: credentials and any supported authentication steps (including MFA) are handled automatically by Leapwork. Use this for fully hands-off login flows.
Manual: the login is performed by a user during recording or execution. Choose this when interactive steps are required (for example, complex or unpredictable MFA flows).
Username: The D365 login username. This is typically a valid organizational account with sufficient permissions for the target D365 application.
Password:The password associated with the specified username. The value is obscured in the UI and handled securely during execution.
OTP result code: Provides the One-Time Password (OTP) value used for MFA during Automated logins. This field is available only when Login method = Automated. You can:
Enter the OTP value manually (for example, from an authenticator app), or
Connect this field to the output of a TOTP block so Leapwork supplies the OTP automatically.
The OTP/TOTP flow works with authentication providers that support shared secrets (such as Microsoft Authenticator, Google Authenticator, Duo Security, and Okta using a secret key). Okta Verify in the new Okta Identity Engine is not supported because it no longer allows manual setup with a secret key.
Browser window: Contains the browser instance used for the login session. It is automatically assigned when the block runs and is used internally to maintain context for subsequent web-automation blocks. In Early Access versions of this feature, only a single browser window is supported and this field is not user-configurable.
Default timeout: Controls how the timeout for this block is determined:
When the checkbox is cleared, the block uses a fixed timeout of 120 seconds unless you change it via Timeout (sec).
When the checkbox is selected, the block uses the Default timeout value defined in the flow settings.
Timeout (sec): Sets the maximum time allowed for the login operation (starting the browser, loading the URL, and completing authentication) before the block stops and triggers Login Failed. The default value is 120 seconds.
This timeout applies only to the Login block. Each case also has a separate global timeout in the Settings panel; if the case exceeds that global timeout, it is cancelled regardless of this block’s timeout.
Login Failed: Activates when the login attempt does not succeed within the configured timeout or when authentication fails.
Use this output to add conditional branches, retries, or error-handling logic in your D365 automation flows.