The Validate and Get blocks are actions within a single smart block created by the D365 Fusion Recorder in Leapwork. They are used to either verify that a UI element in a Dynamics 365 Finance & Operations (D365 F&O) application meets a specific condition, or to extract the element’s current value at runtime.
You access these blocks while recording by holding Shift and left-clicking a target UI element in the D365 F&O interface, then choosing the desired Action (Validate or Get) from the menu.
These blocks only work in browser windows that were launched using the Login block or within the current D365 recording session.
Validate Block
The Validate block checks that a D365 F&O UI element satisfies a specific condition, such as containing a given value, being visible, or being enabled. When the expected state is met, the flow can continue; if it is not met within the timeout, the block can trigger a failure path.
Validation can also be applied inside grid elements, enabling automated checks within tabular interfaces.
Note: The screenshot on this page uses the Elegance Design, introduced in 2025.3. If you are using an earlier version, your layout may look different.
Quick-start
Start the Fusion Recorder in D365 F&O and record your scenario. When you reach the target UI element, press Shift + left-click and choose Validate to create a Validate block in the recording.
Save and close the Fusion Recorder so the recorded flow – including the Validate block – is converted into a Flow flow. Optionally, adjust parameters such as Is case sensitive, Await not found, and Default Timeout in the generated block.
Run the flow from Flow when it’s ready.
Building block parameters
Parameters
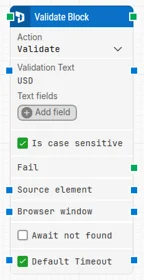
Block header
Shows the automatically generated title for the Validate block, typically based on the element being validated (for example, Validate Name Field). You can rename it at any time by double-clicking the header and typing a new title to make the flow easier to read.
Action (input)
Defines what the block does. For this block, set Action = Validate to perform a verification check on the selected UI element. The same dropdown can also expose other actions (such as Get), allowing you to switch behaviour without recreating the block.
Validation Text (input)
Specifies the expected text content of the target element. During execution, the block compares the element’s value with this text when performing the validation.
Text fields (input)
Provides a list of named fields whose values can be injected dynamically into Validation Text.
Use Add field to create key–value pairs.
Right-click Validation Text and choose Insert token to insert a field as a token.
This allows the validation to use dynamic values, such as data captured earlier in the flow or passed in from other blocks.
Is case sensitive (input)
Controls whether the comparison should be case-sensitive.
When this option is enabled (checked), the validation only passes if upper- and lowercase characters match exactly.
When disabled, the comparison ignores case differences.
Fail (output)
Triggers if the validation condition is not met within the allowed time. You can connect this output to a Fail block or an alternative branch to handle unsuccessful validations.
Source element (input)
Optionally restricts the validation to run inside a previously captured parent container (for example, a specific panel or section). In some Early Access versions of the smart recorder, this field may not yet be configurable, but the behaviour is reserved for scoping validations.
Browser window (input)
Defines which browser window instance the validation should run against. During recording, this is assigned automatically based on the active D365 F&O window. In Early Access versions, only one browser window is supported and this field is not user-configurable.
Await not found (input)
Changes the validation behaviour so that the block waits for the element to disappear instead of confirming that it is present. When checked, the block assumes the element is currently present and proceeds only once it can no longer be found on the page.
Default Timeout (input)
Determines how the timeout for this block is derived:
When the checkbox is not selected, the block uses a fixed timeout of 10 seconds unless you override it via Timeout.
When the checkbox is selected, the block uses the Default Timeout value defined in the flow settings.
Timeout (input)
Specifies the maximum time allowed to complete the validation before the block gives up and triggers the Fail output. This timeout applies only to this block.
Every case also has a separate global timeout configured in the Settings panel; if the entire case runs longer than that global timeout, the case is cancelled regardless of this block’s own timeout.
Get Block
The Get block retrieves the current content of a UI element in a D365 F&O application. It can extract field values, labels, or calculated results at runtime so they can be reused elsewhere in the automation flow, for example in validations, decisions, or logging.
You create this block from the Fusion Recorder by pressing Shift + left-click on a target element and choosing Get from the available actions.
Note: The screenshot on this page uses the Elegance Design, introduced in 2025.3. If you are using an earlier version, your layout may look different.
Quick-start
Start the Fusion Recorder in D365 F&O and record your scenario. When you reach the target UI element, press Shift + left-click and choose Get to create a Get block in the recording.
Save and close the Fusion Recorder so the recorded flow – including the Get block – is converted into a Flow flow. Optionally, adjust parameters such as Await not found and Default Timeout in the generated block.
Run the flow from Flow when it’s ready.
Building block parameters
Parameters
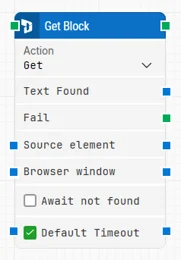
Block header
Displays the automatically generated title for the Get block, typically based on the element being read (for example, Get Bank Management). You can rename it by double-clicking the header and entering a new name.
Action (input)
Defines the behaviour of the block. Set Action = Get to extract the current value of the selected UI element. The dropdown also includes the Validate action, allowing you to switch between validating and retrieving without replacing the block.
Text Found (output)
Provides the value extracted from the UI element when the element is successfully found. You can connect this output to other blocks that need the value, such as assignments, calculations, or further validations.
Fail (output)
Triggers if the element cannot be found or the value cannot be retrieved within the configured timeout. This output can be used to branch the flow or explicitly fail the case.
Source Element (input)
Optionally limits the search to a previously captured parent container so that the block operates only within a specific section or component. This is useful in complex pages where similar elements appear in multiple regions.
Browser Window (input)
Specifies the browser window where the Get operation should run. During recording, this is assigned automatically. In Early Access versions of the Smart Recorder, only one browser window is supported and this field is not editable.
Await not found (input)
When checked, the block assumes that the web element is currently present and waits until it can no longer be found before proceeding. This is typically used to confirm that an element has disappeared (for example, a loading indicator).
Default Timeout (input)
Controls how the timeout is calculated:
If the checkbox is cleared, the block uses a fixed timeout of 10 seconds unless a different Timeout value is set.
If the checkbox is selected, the block uses the Default Timeout value from the flow settings.
Timeout (input)
Sets the maximum time allowed to get the specified text before giving up and triggering the Fail output. As with the Validate block, this timeout is local to the block. The overall case may still be stopped earlier or later based on the global timeout configured under Settings.