The Electron File Upload block uploads a file in an Electron-based application by interacting with the file upload control and providing a file from the selected source. This removes the need for manual interaction with file selection dialogs and enables fully automated upload flows.
When fully expanded, the following is an example of the Electron File Upload block:
Note: The screenshot on this page uses the Elegance Design, introduced in 2025.3. If you are using an earlier version, your layout may look different.
Quick-start
Drag Electron File Upload onto the canvas.
Connect the block in the flow and specify Select File Upload element (required) and Source type, then choose the file to upload under File Input. Optionally set Source element, Electron window, and Use occurred, and configure timeout/search behavior settings if needed.
Run the flow when it’s ready.
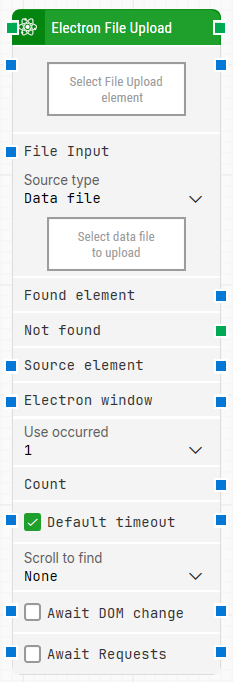
Building block parameters
Parameters
Block header: The green input connector triggers the block to start executing. The green output connector triggers when the file has been successfully uploaded. You can rename the block by double-clicking the header text and typing a new title.
Select File Upload element: Required. Contains the locator for the file upload element. Use this to identify the UI control that opens or represents file selection/upload in the Electron application.
File Input: Provides the file that will be uploaded. If the received file is missing or invalid, the block returns an error and stops execution. Available from 2025.1.173 onward.
Source type: Selects how the file is provided.
Data file: Uploads a file stored in Leapwork as a Data File.
Local path: Uploads a file from a local file system location.
Path to file: Specifies the local path to the file to upload. Use this when you want the upload to refer to a file path rather than selecting a Data File from Leapwork.
Found element: Contains the found Electron element in the application window. You can reuse it as a Source element in other blocks to narrow down searches (for example, locating elements inside a specific container).
Not found: Triggers if the Electron element is not found before the timeout. This is typically used to branch the execution flow or explicitly fail a case by linking it to a Fail block.
Source element: Limits the locator to only work inside the provided source element when you choose the Element option.
Electron window: Contains a handle to the Electron window once it is found and focused. Use this when multiple windows are open to ensure the upload is performed in the correct window.
Use occurred: Selects which occurrence of the Electron element to use if more than one match is found. Select All to iterate through all occurrences.
Count: Outputs the total number of found Electron elements that match the locator.
Default timeout: Controls whether the block uses the default timeout from the flow settings or a custom timeout value.
Timeout (sec): Sets the maximum time spent searching for the Electron element before the block gives up and triggers Not found. This field is used when Default timeout is not selected.
Scroll to find: Controls whether the block scrolls while searching for the Electron element. When a value other than None is selected, the block uses scrolling during the search.
Max repeats: Sets the maximum number of scroll attempts before the block stops searching.
Amount: Sets how much scrolling is performed on each repeat.
Delay (sec): Sets the delay in seconds between each scroll attempt.
Await DOM change: Delays the search until there have been no DOM changes for a specified period (for example, three seconds). This is useful when waiting for behind-the-scenes JavaScript updates. Regardless of this checkbox, the search and upload occur after waiting a maximum of 30 seconds.
Await Requests: Delays the search until there have been no active XHR requests for a specified period (for example, three seconds). Regardless of this checkbox, the search and upload occur after waiting a maximum of 30 seconds.