-
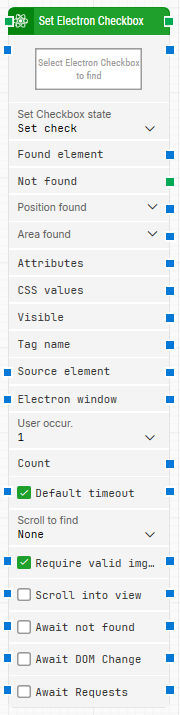
Block header: The green input connector triggers this block to begin execution. The green output connector triggers when the Electron checkbox is successfully set. You can rename the block by double-clicking the header text and typing in a new title.
-
Select Electron Checkbox to find: Required. Contains the locator for the Electron checkbox to be found. Capture a locator by right-clicking the property and selecting Capture new Electron Checkbox. Clear the locator by right-clicking and selecting Clear Electron Checkbox.
-
Set Checkbox state: Selects the checkbox state to apply.
-
Found element: Contains the found Electron element in the application window. You can reuse it as a Source element in other blocks to narrow down searches (for example, locating table cells inside a specific container).
-
Not found: Triggers if the Electron element is not found before the timeout. This is typically used to branch the flow or explicitly fail a case by linking it to a Fail block.
-
Position found: Outputs the application canvas position where the Electron element was found as X, Y coordinates. The top-left corner of the application canvas is 0, 0.
-
Area found: Outputs the application canvas position and size of the found Electron element as X, Y, Width, Height, starting with the upper-leftmost pixel. The top-left corner of the screen is 0, 0.
-
Attributes: Outputs all attributes on the found Electron element as key: value pairs, including standard HTML attributes (for example class, style, href) and custom attributes (for example data-xxx). If you need to work with a single attribute directly, use Get Electron Attribute.
-
CSS values: Currently unused.
-
Visible: Returns True if the found Electron element is visible.
-
Tag name: Returns the tag name of the found Electron element (for example div, tr, button, input).
-
Source element: Limits the Electron element locator to only work inside the provided source element when you choose the Element option.
-
Electron window: Contains a handle to the Electron window once it is found and focused. Use this when multiple windows are open to direct the block to operate on a specific window.
-
Use occurrence: Selects which occurrence of the Electron element to use if more than one match is found. Select All to iterate through all occurrences.
-
Count: Outputs the total number of found Electron elements that match the locator.
-
Default timeout: Controls whether the block uses the default timeout from the flow settings or a custom timeout value.
-
Timeout (sec): Sets the maximum time spent searching for the Electron element before the block gives up and triggers Not found. This field is used when Default timeout is not selected.
-
Scroll to find: Controls whether the block scrolls while searching for the Electron element. When a value other than None is selected, the block uses scrolling during the search.
-
Require valid images: When enabled, any locator that is set to find an image (img tag) also validates that the image loads correctly.
-
Scroll into view: When enabled, any found Electron element is automatically scrolled into view.
-
Await not found: When enabled, the block assumes the Electron element is currently present and waits until it can no longer be found before proceeding.
-
Await DOM change: Delays the search until there have been no DOM changes for a specified period (for example, three seconds). This is useful when waiting for behind-the-scenes JavaScript updates. Regardless of this checkbox, the search and action occur after waiting a maximum of 30 seconds.
-
Await Requests: Delays the search until there have been no active XHR requests for a specified period (for example, three seconds). Regardless of this checkbox, the search and action occur after waiting a maximum of 30 seconds.