-
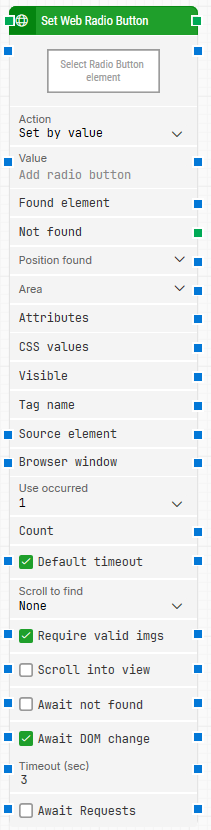
Block header: The green input connector triggers the block to start executing. The green output connector triggers when the radio button has been set. You can rename the block by double-clicking the header text and typing a new title.
-
Select Web Radio Element: Required. Contains the locator for the radio button element to set. Capture a locator by right-clicking the property and selecting Capture new web element. Once set, you can edit it via Edit web element, or clear it via Clear web element.
-
Action: Chooses how the radio button option is selected.
-
Set by value: Selects the option based on its value.
-
Set by text: Selects the option based on its visible text.
-
Set by index: Selects the option based on its index.
-
Value: Specifies the value, text, or index used to select the radio button, depending on the selected Action.
-
Found element: Contains the found web element in the browser window. You can use it as a Source element in other blocks to narrow down searches (for example, locating table cells inside a specific table).
-
Not found: Triggers if the web element is not found before the timeout. This is typically used to branch execution flow or explicitly fail a case by linking it to a Fail block.
-
Position found: Outputs the browser canvas position where the web element was found as X, Y coordinates. The top-left corner of the browser canvas is 0, 0. Use the expander to work with X and Y separately.
Web elements that are not visible (for example hidden via a CSS class) may have position 0, 0.
-
Area: Outputs the browser canvas position and size of the found web element as X, Y, Width, Height, starting from the upper-leftmost pixel. The top-left corner is 0, 0. Use the expander to work with position/size and their nested sub-properties separately.
-
Attributes: Outputs all attributes on the found web element as key: value pairs. This includes standard HTML attributes (for example class, style, href) and custom attributes (for example data-xxx). If you need to work with a single attribute directly, use Get Web Attribute instead.
-
CSS values: Currently unused.
-
Visible: Returns True if the found web element is visible.
-
Tag name: Returns the tag name of the found web element (for example div, tr, button, input).
-
Source element: Limits the locator so it only searches within the provided source element. This is useful when you first find a container (for example a table) and then want to locate a specific element inside it.
-
Browser window: Specifies which browser window the block should use.
Note: Multiple browser windows are not supported by Selenium Grid or external cloud providers such as Sauce Labs and BrowserStack.
-
Use occurred: Selects which occurrence of the web element to use if more than one match is found. Select All to iterate through all occurrences. When All is selected, Current index and Completed are shown.
-
Count: Outputs the total number of found web elements that match the locator.
-
Current index: Outputs the current index while iterating through all occurrences. For example, if three occurrences are found, this value is 1 for the first, then 2, then 3.
-
Completed: Triggers when iteration through all occurrences has completed.
-
Default timeout: Controls whether the block uses the default timeout from the flow settings or a custom timeout value.
-
Timeout: The maximum time spent searching for the web element before giving up and triggering Not found. This field is used when Default timeout is not selected.
Note: All cases have a global timeout configured in the Settings panel. This is unrelated to the timeout of a single building block. However, a running case will automatically be cancelled if it runs for longer than the global timeout.
-
Scroll to find: Controls whether the block scrolls while searching for the element. When a value other than None is selected, the block uses scrolling to search for elements in scrollable pages (for example pages using infinite scroll).
-
Max repeats: Sets the maximum number of scroll attempts before the block stops searching.
-
Amount: Sets the amount of scrolling performed on each repeat.
-
Delay (sec): Sets the delay in seconds between each scroll amount.
-
Require valid imgs: When enabled, any locator that targets an image (img tag) is also validated to ensure the image loads correctly. Leapwork validates this by sending an HTTP request to the image source and checking that it returns a 200 response.
-
Scroll into view: Scrolls the page so the found element is brought into view before returning its state.
-
Await not found: When enabled, the block assumes the element is currently present and waits until it can no longer be found before proceeding. This can be useful when waiting for a “Loading” message or similar indicator to disappear.
-
Await DOM change: Delays the search until there have been no DOM changes for a specified period (for example, three seconds). This is useful when waiting for behind-the-scenes JavaScript updates. Regardless of this checkbox, the search occurs after waiting a maximum of 30 seconds.
-
Await Timeout: The number of seconds the DOM must have had no changes before proceeding.
-
Await Requests: Delays the search until there have been no active XHR requests for a specified period (for example, three seconds). This is useful for applications that update heavily in the background (including Dynamics 365 and Salesforce). Regardless of this checkbox, the search occurs after waiting a maximum of 30 seconds.
-
Await Timeout: The number of seconds no XHR requests must have been active before proceeding